New board - beginning of long road to next simplefoc flagship board blds/stepper

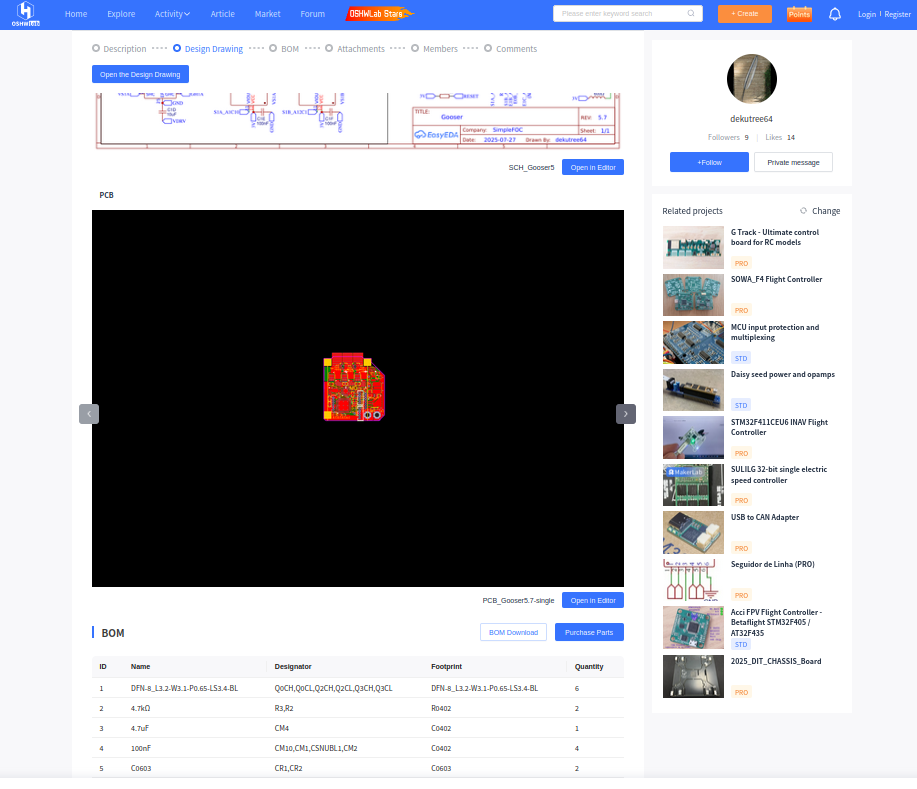
I hacked up another board to just add another driver output, for a stepper motor instead of 3 phase bldc. I am the first to say that there is a major problem with everything everyone publishes being a hackjob that is only marginally useful to anyone else, but unfortunately the economics are not something I am immune to more than anyone else. My priority is to get something that works, then I can improve it later.

This does at least integrate the wisdom that has been accumulated on the good components and so on. However I did not have time to beef up the current capacity of various routes. That would have to be left for another time, I prersonally only need like 3 amps so I can’t spend much time on that.

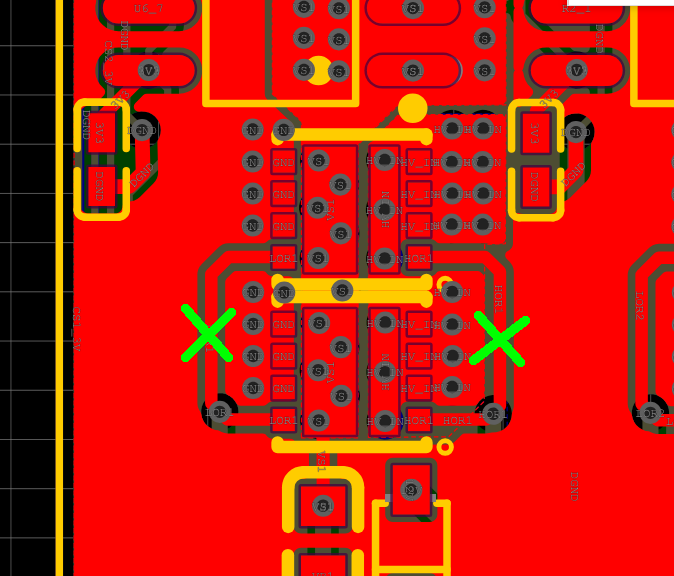
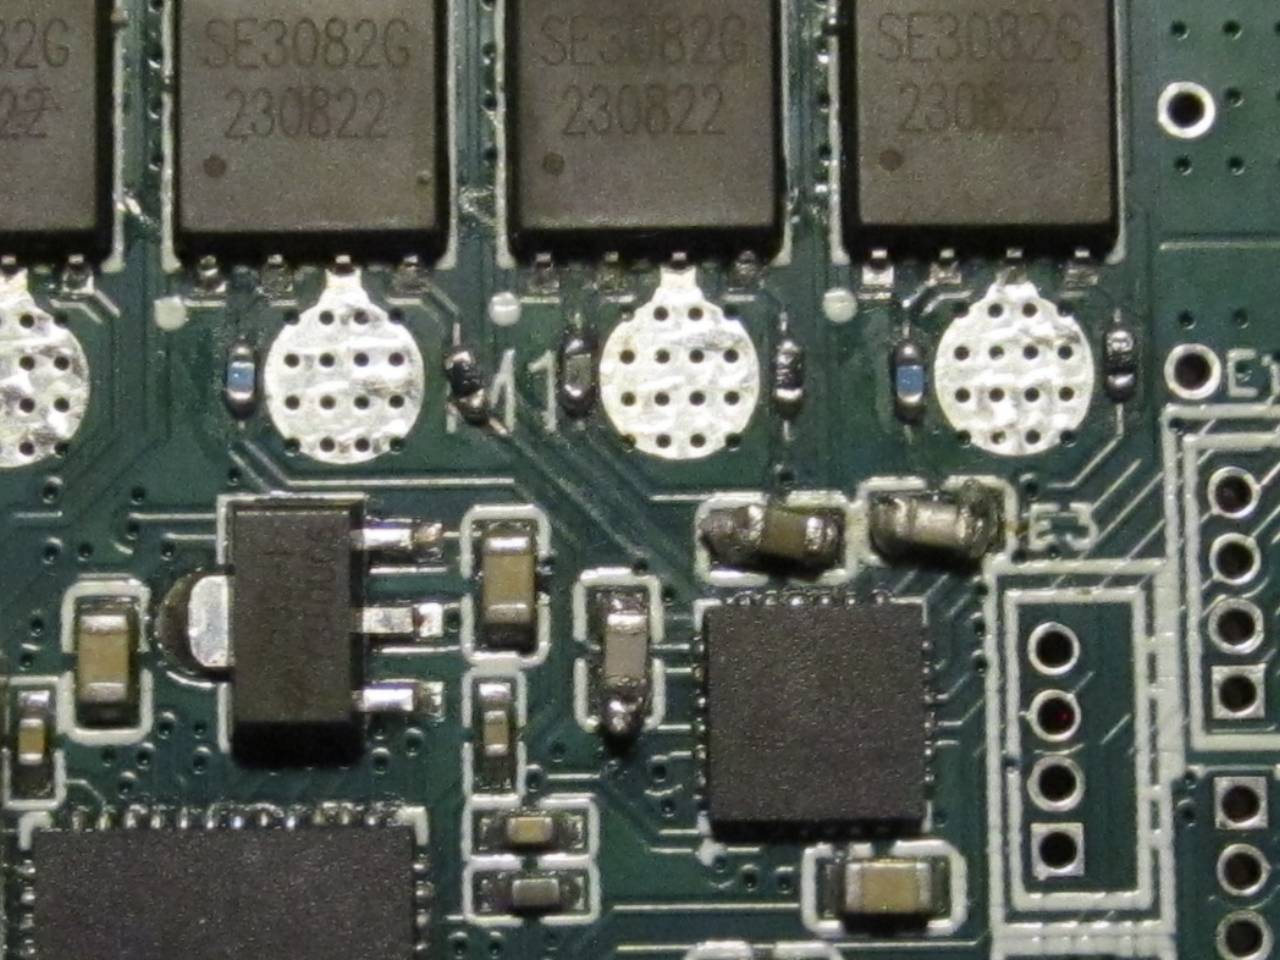
The previous version of this board was non functional due to a severe noise issue. Same as it’s predecessor the lepton. I added 10 ohm snubber resistors to the mosfet gates and an RC filter after the RFI filter to hopefully solve this issue. The B-g431-esc1 board works fine so I don’t believe it’s impossible to get this noise issue solved without extremely expensive mosfet drivers.

Can anyone spot any issues that would prevent this board from driving a 2 phase stepper motor so I can fix it before fabrication?

I know it’s hard to get people to agree on a single board to use as a flagship board but remember it doesn’t have to fit all purposes. We’ve disussed this in the past and a board like this can meet 90% of needs and it’s pretty silly we don’t have one yet. Everyone is always way back at the starting line every time we need a motor driver board. We should have a reasonably usable one that suits the basic things people often come into the forum needing to do. The simplefoc flagship board that’s currently available really doesn’t suit most needs.

I deliberately made the snubber resistor one with a big package so I can remove it and replace it with a different one if that is warranted, to experiment.

Getting a board that works for everyone is probably not feasible. Because everyone has wildly varying requirements such as how they want to mount the sensor (or which external sensor they prefer), what voltage and current is needed, what communication interfaces are required, how much capacitance you want onboard, what connectors you prefer or just solder pads, what form factor it needs to be in, and most importantly cost. And some people want to be able to drive stepper motors as well with the same board. Because it is not possible to fulfil all these at the same time, that’s why there is no single “best“ board and it’s why people tend to go and make custom boards. Making a custom board is also fun and a good learning experience.

Taking my BLDC Driver V5 board as an example, it works well at driving the BLDC motors I have, and I would consider it to be a good flagship board. But other people might not like it because it uses RDSon current sensing (lowside) which requires more software work, and the only encoder that works well is a sin/cos encoder (either built into the motor or added with AS5115 magnetic encoder). It also has no mounting holes making mounting a bit more challenging, and it’s quite expensive to produce.

There’s also the SimpleFOC Bento board being developed which you should also take a look at, it seems to be good for many basic use cases.

For your board, my recommendations are:
Remove the split ground and the RC filter and the RFI filter.
Make the ground planes span the whole board.
Connect unused input pins of the second driver IC to GND or 3V3 so they don’t float.
Use wider traces for the gate signals, I suggest 0.2mm or more.
Add a few polymer electrolytic capacitors in the spare area.
In general it just needs more time to optimize the PCB routing.

Also if you’re planning to design a board for the community to use, it’s best to state your goals and target applications for the board, such as whether you want low cost, balanced, or high performance, voltage / current ratings, I/O capabilities, other special features etc.

Do you have any working Qvadrans left? It would be a lot cheaper to do some micro-surgery on one to add gate resistors and see if that’s the source of your noise problems. Perhaps remove the lower mosfets to make it easier, since the traces between the vias and their gate pins are very short. Grind an x-acto knife to a 0.3mm wide chisel point, and use it to scrape the soldermask and cut the traces here:


0402 resistors will solder to 0.15mm traces just fine. If you’d like, you can mail the board to me and I’ll do the work and mail it back to you for testing. I added resistors on GooserCS when I was struggling with bad mosfets, so I’m confident I can do a good job of it. I have 17.8 ohm and 25.5 ohm on hand.

A fourth phase would be nice to have for 3-phase motors too, since it can be used to drive a brake resistor. I’d recommend doing it properly with a 4-channel gate driver or four discrete gate drivers. My aesthetic sense just can’t tolerate the idea of using a second DRV8300 for one more channel in a flagship board :slight_smile: And doing it for testing doesn’t really accomplish anything since it will need re-tested after changing drivers.

I’d also like to change it to use single-channel mosfets since they’re more future-proof. And possibly RDSon current sensing like Andrew’s board. If we stick with halls, I’d recommend removing one of them. Hall current sensors are very noisy, so you need a lot of oversampling to get good readings, and two channels can be done simultaneously with the two ADC units using simpler ADC code than you need for three. And from my testing, there was no discernable difference in signal quality with three sensors.

I also agree with Andrew that the gates should use wider traces. DRV8300’s datasheet says 10 mil (0.25mm). Though I haven’t had any trouble with 0.15mm on GooserCS, so it’s not a big deal either way.

I’m underqualified to recommend split ground or not. All I know is from this video I watched last year, which IIRC says it’s generally not beneficial:

Yeah, I would say those are the main two drawbacks of your design. Unfortunately I can’t see any way to fit even quarter-holes for mounting without significantly increasing the board size. But for cost, see if you can use 0.3mm vias and make it functional with 4 layers for applications that don’t need maximum current/thermal dissipation, and move as many of the 0402 capacitors as possible to the back side. The top side looks reasonably easy to assemble by hand, which would save a ton of money on small batches. And with (I think) only the CPU incurring an extended parts fee, paying JLC to do all the tedious capacitor placement will be pretty cheap.

The RDSon sensing sounds like a great cost/space saving feature. Would you consider writing an article on it? Both the hardware design and software/calibration process. My designs always focus on small size and low cost per motor, so it would be great to eliminate the current sensors. Would it be possible to do using the STM32’s built-in opamps so I can stick with my usual DRV8300 instead of your larger DRV8323?

For my boards, V5 and V6 - see my earlier board review post, are high performance designs, while V4 is the low cost design. The V6 brings back the mounting holes with 2x full M2 screw holes with many other improvements, at a higher price point. I’m not too interested in trying to make the high performance versions hand-assembly friendly as the reliability of hand assembled boards isn’t great in my experience, and it’s hard to hand assemble high density without accidentally knocking nearby components. But for the V4 boards they are low cost and hand assembly friendly (reflow oven needed), and I have successfully assembled many by hand, and the 8 layer version is within the $2 PCB special offer capabilities from JLCPCB.

RDSon current sensing abuses the fact that most MOSFETs (from well known brands) perform better than the stated tolerance. In my experience parts from Chinese brands don’t overperform and are therefore unsuitable for RDSon current sensing unless you use a per-unit calibration routine with an external current sensor. It also needs temperature compensation to remain usable, so you either have to put external temp sensors close to the MOSFETs or use a board design which acts as a heat spreader alongside the MCU internal temp sensor, meaning low cost goes out the window if you choose RDSon current sensing. Also due to the high voltages involved, building a discreet circuit around it requires using high voltage switches and a ton of passives, therefore is impractical with STM32 internal OPAMPs. There is only a limited selection of chips that can do it, some options are the DRV8323, DRV8353, 6EDL7141 and RAA227063. RDSon current sensing is usually less accurate than other current sensing methods like hall effect and resistor current sensing.

The reason I use RDSon current sensing is mainly because of the zero additional power losses with the additional benefits of easier layout enabling faster switching and less board space. I plan to do a more complete write-up of how RDSon current sensing works and an overview of my implementation once my V6 boards arrive and I implement the RDSon current sensing again as I’ve changed the MOSFETs from V5. I’ll probably post it to OSHWLab within the next 3 months.

Also regarding the split ground it’s generally not beneficial in most designs. The main reason is that high frequency current likes to follow the ground plane underneath, and with good ground plane it won’t spread much. But there are a few exceptions such as motor drivers with sensitive analog circuits, because of high magnitude low frequency currents close to DC, which will spread out across the ground plane and cause different parts of the circuit to see different GND potentials. In this case splitting the GND will block the big low frequency currents from reaching the sensitive analog parts. However, most motor drivers we design don’t have extremely sensitive analog circuitry that will be affected by this, so we can get away with a non split ground. And with multi layer heavy copper PCBs with big solid ground planes, the ground bounce can be mitigated significantly.

The reason I suggest removing split GND is because the split isn’t done correctly here, you need to isolate EVERYTHING between the two GNDs and can’t have signals crossing between them except at the point of the split.

Also I’d appreciate some more reviews of my V6 driver, currently I’m still waiting for JLCPCB to restock an inductor before I can place the order.

1 Like

There are already large threads on the subject of this board, I should have linked to them. There are mounting holes, at the corners of the old board. It’s also going to take two or three more rounds of fabrication, my main goal here is to just get something that at least works. The QVADRANS didn’t work for squat. It was totally non functional.

Deku: I have one QVADRANS left, can’t find the other two, I tried to get in there but it really is too small :(.

Thanks a great deal for the suggestions, both of you, I will refer to them when it comes time to make the next board, but I did wait for a few days and then I had to go, so it’s already been submitted for fabrication now.

That board you linked to Andrew is not suitable for stepper motors unfortunately.

Also I’m sorry but it’s unbelievably frustrating to hear the exact same stuff that I heard and thought we had surpassed what 2 years ago? Everyone just keeps going around in circles doing exactly the same thing. There are literally dozens of board “designs” littering this forum and the internet, almost none of which are ever useful to anyone, and even the original creators have only marginal use for them. Many of them literally don’t even work at all even though people who go on and on about the details of extra grounding caps in the right places etc. designed them. A whole ton of people swarmed the QVADRANS designs and it didn’t work for jack. Not even a little bit.

So people buy the b-g431-esc one board, or try cockamamie schemes to roll their own. Again and again. I’ve bought at least 20 b-g431-esc1 boards, for at least 4 different projects. And I would have bought it several more times if it could do stepper motors.

As I’ve said a million times before, it doesn’t have to meet “all” needs. It’s clearly possible to do better than the b-g431-esc1 board in many ways. One single step up from that would be huge progress over the current mess and is clearly possible. And yet somehow we can’t do even that, not even in 2 years elapsed time.

I don’t mean to be harsh on anyone personally. I just believe it is clearly possible to do at least a bit better. And yet the community really doesn’t come together, and the wizards that do this kind of thing to be honest seem to go around in circles. The boards end up way too complicated and expensive, for instance. I was going to work with Sequoia and waited a long time for her to do some testing so I could take it from there, but then the whole thing was unbelievably complicated and expensive. I would have to basically redo everything, so I just bailed on that and went back to trying to get the qvadrans working.

Sorry I wasn’t able to reply before you placed the order. I’ve been unable to access the forum for the past week or so since the software was updated and no longer works on any browsers in Windows 7. Finally pushed me into trying Linux, which is even worse than Windows 10 so far in terms of irritating features (or lack thereof), but hopefully I can wrestle it into submission…

By the way, are you aware of the hybrid stepper code? It allows controlling stepper motors using 3-phase drivers by joining two of the pins together. I don’t really understand how it works or what the drawbacks are compared to a proper 4 phase driver, but maybe could be of some use Stepper Motor Control with SimpleFOCShield | Arduino-FOC

And what do you think of my Gooser 5 as a potential flagship? Perhaps its main disadvantage is having too many options for different use cases :slight_smile: Or the somewhat limited selection of I/O pins and lack of CAN bus that many users would want. And possibly similar noise problems as Lepton and such, but I don’t know how to test for that. The images posted in the thread are the largest and smallest variants, but the single-motor and dual-motor with buck converters are more general-purpose. To use single-sided JLC assembly you have to manually solder a couple SMD electrolytics and 0603 capacitors on the back for each motor, but hopefully that’s easy enough for most people with a soldering iron. And I still need to finish testing everything (probably next month).

When testing the max current of my boards (4-layer 1oz/0.5oz) using my finger as a thermometer, it seems the mosfet/current sensor/motor wire area has fairly consistent temperature, which is much higher than anywhere else… so not very good at spreading heat, despite the bottom layer and Inner1 being almost entirely dedicated to the power rails.

A small thermistor placed near the mosfets would probably work well enough for cheap temperature sensing. The added cost of Infineon mosfets compared to Chinese would be offset by the eliminated cost of current sensors, so similar total. The larger driver chip would cancel out some of the space savings, but still smaller overall.

Another major advantage of RDSon sensing for 1oz copper boards is that you can solder the motor wires almost directly to the mosfet pins, significantly reducing heating compared to having a run of PCB copper from the mosfets to the sensor and another to the motor wire pad.

I’ll check out the gooser and the interesting method of driving a stepper with a 4 phase approach, presumably it would produce suboptimal drive though :(.

The gooser looks awesome. I will try to do the thing with two of the leads tied together and the motor working as a hybrid stepper as for some reason the quad half h-bridge is not used often and I worry it may not go well, plus I would like to get on with things. I thought about it yesterday and I see no obvious reason it can’t work with no audible noise.

How do I get the single motor variant of the gooser? If I use it I owe you bigtime and would try to advocate for it to be adopted as the main community go to board. We really need to pick/dev one that works reasonably well and actualy put it on the web page, that page with the driver boards is totally out of date now. Very few people can/will search the forums and find a good board like that.

I would have to change the connectors on the gooser, and I think it’s important to break out the 5 volts, and a bunch, perhaps all, of the microcontroller pins as there are a lot of important uses for them as a general purpose board. We need something flexible and generic. Size is not the most important thing, even current capacity is not super critical for most things most of the time, but if you need to access a pin you need that pin. Also these connectors are always hard to work with in my experience. I would put the pins on the edge of the board, 2.54 mm pitch through holes. Then you can really get in there and do what you need to do.

Either open the board you want in EasyEDA and use the one-click order in the fabrication menu, or I could assemble one of the v5.5 bare boards I have on hand (very similar, just lacking the refinements listed in that last thread post).

It is possible the current sensors will be too noisy for your ultra-silent use cases. Oversampling helps a lot, but as seen in the thread, I was still getting some pretty wild signals at higher speeds. I can’t tell any difference in audible motor noise compared to B-G431B-ESC1, but you’d probably be best served by shunt sensors with INA240 Calibrating inline current sense for the ESP32s3 - #7 by Antun_Skuric

Yeah, I’d planned to request that once it’s fully validated. It’s theoretically complete, but not quite time to make a big announcement yet.

The buck outputs are accessible via the LVin and VDRV pins on the aux connector.

The pin accessibility issue is one reason I’m not too fond of generic boards. For real-world use it’s really nice to have them grouped by purpose with connectors, and that necessitates having some idea of how they’ll be used. The Qvadrans approach of surrounding the CPU with header pins gives more flexibility, but quickly turns into an incomprehensible wire nest. Nonetheless it would be nice to get the remaining unused pins accessible somewhere. And using 2.54mm pitch for pin headers and connectors would be fine if size is of no concern.

For my application (robo-bird), size is critically important, as is cost. I really only need two high power motors, and 6 lower power, but since I wasn’t able to significantly reduce the size or cost without them being drastically lower power (though in hindsight, I probably could have with the Qvadrans mosfets), I just copy-pasted the high power driver. Gooser 4 and 5 both fulfill my needs for that project, so any future development can relax the size constraint.

I’ve looked at the Gooser 5 boards more closely and I have a few suggestions:

Replace both the high voltage and low voltage bucks with the TPS54302, it’s much more modern and has much better efficiency. It’s also really cheap at JLCPCB / LCSC.

For mass production you should make another version which removes the large soldermask openings on the bottom layer for the copper bars, it could cause yield issues when doing PCBA, which I assume will be quite popular with people who don’t have the SMD soldering skills or equipment, or want something that just works. And even for people with the equipment and skills to assemble at home, I doubt many people would be able to manufacture the copper bars at a low enough cost to justify it over just paying the extra for 2oz copper weight.

1 Like

Someone previously floated the idea of leaving the copper area tinned so it could be flooded with solder.

Also why do we need buck regulators? Linear regulators are fine here, we don’t need much current and energy efficiency is not a priority. Buck regulators are more complex and can produce noise although they seem to be surprisingly good given how they work, which is basically a powerful oscillator.

But again this is getting into the details, trying to run before we are crawling. A single motor variant would be the first step. Unit size. A module that is general purpose and broadly applicable. It says in the page that there is a “variant” but it’s not at all clear where the actual design files for this variant are. Modifying the design files quickly introduces all kinds of complications. A ready to make board design is needed, sooner or later. I can make it but if I’m going to modify the design then I have to test things all over again, a single error in a single spot could make it non functional or cause issues. That’s exactly why you make one unit sized design and do a thorough job. Making all these variants is something I’ve seen people do in my career and I always had to counsel againt it. It makes more sense to have complete desings. One for this, one for that, that’s fine, but only complete finished actual designs.

There was one boss once who wanted to make “scaleable” designs. Like you could just enter a number into the CAD program and it would make it bigger or smaller. I had to explain to him that makes no sense. You have one design, get it working, if you want to make a think of 2x capacity then you design that and get it working. Complete actual finished desings. Never tell the user they need to modify it unless strictly needed - or well just not populating some pads seems pretty reasonable in many cases. Like if you don’t need the CAN tranceiver or whatever just don’t populate that. But the current sensors for instance, then you have to remember to bridge the pads with solder before the thing works. That’s reasonable I think. But imo the primary focus should be, first, on the unit size intermediate compromise device. When and only when that is done, you branch out.

Thanks! It would be nice to eliminate an extended parts fee by using the same part for both bucks. The 28V input limit does eliminate the option to use 40V mosfets for higher operating voltage, but 24V/6S lipo should satisfy most users.

Agreed. Copper bars (or solder flooding) are pretty impractical to use now with the SMD electrolytics. I kept the large exposed areas since they give flexibility in capacitor choice if you order single-side assembled, but for both sides assembled it would be better to have proper mask openings to guarantee the solder paste remains confined to the pad area when melted.

Page through the PCB variants on the oshwlab page to find the one you want, and click “open in editor”. Then “One-click Order PCB/SMT” in the Fabrication menu.

Let’s see how much current the DRV8300 needs… From the datasheet, it looks like only 1mA idle usage. The mosfet total gate charge is 39nC, so to charge and discharge 6 mosfets 25000 times per second, it comes out to 12.7mA total. If we regulate from 24V to 12V, that’s 150mW waste. Four motors would be too much for SOT89 (500mW max), but one regulator for each dual-motor section should be ok. Regulating to maybe 18V is an option too (abs max is 20V), but driving the gates at high voltage without resistors seems like asking for ringing problems.

3.3V current consumption is ~55mA for one motor, ~75mA for two. So regulating from 24V to 3.3V would have to dissipate over 1W for one motor, and 3W for quad. Too much, I think.

I prefer multi-motor boards for simplicity of physical construction. The single battery connection is a huge clutter-saver. Just look how much bigger Andrew’s v6 got when accounting for the space taken by external wiring. Multi-motor does carry the risk of burning one driver beyond repair and having to scrap all the others with it, but that’s pretty rare with current sense.

So while I do agree that it’s best to refine one design, I’d argue Gooser is eactly that for multi-motor. One design that can be used for as many or as few motors as you want with minimal editing so there’s little risk of introducing problems.

But I wouldn’t recommend trying to make any major changes to it like breaking out new CPU pins or changing to 2.54mm pitch. If those are dealbreakers, start a new PCB layout from scratch (and change to shunts with INA240 while you’re at it). I can’t do it for you since our design philosophies are different, but I’d be happy to help you along with it and explain the rationale behind all my design decisions.

1 Like

ok fair enough. I think probably I’ll use the exact schematic you’ve worked out and use flux.ai to make the pcb.

My latest prototype, shared above, doesn’t work very well. The 10 ohm resistors are messing things up when they were supposed to help. Also the auto router somehow fucked up one important net, making it very hard to connect to program (that’s just a bug but still that’s the point, they are expensive and time consuming).

Clearly other people more skilled than me have found the hard way that the power stage is surprisingly hard. The problem is things were never done in a modular way so as you say when you change one thing you have to change everything and then check everything all over again, and of course new bugs come in most of the time. This is why modularity is so important.

the variant thing is only giving the pcb. How do I get all the needed design files for the single motor variant? Mostly I need the schematic. I’ll have to modify it for the fourth output, wire it and then do thing on flux.ai from there on. Actually to be honest I thought I remembered it used an integrated chip. I see now it uses the drivers and mosfets. I think I’m going to end up going around in circles all over again if I try to do this. I need an exact complete known working power stage, otherwise I better go for one of the drv chips I think, or it’s going to be some crazy problem that wil take many many prototypes to get everything worked out, and I can’t afford that for the common good. Not when nobody else expresses any interest in doing things in a way that lays a foundation for others.

True, I only made a schematic for the dual-motor version. Quad is just two of those plus the copied TVS diode and snubber capacitor in the left side power input area. For single motor, delete the “Motor 1” area and the resulting stray nets on the CPU (TIM8x, S1x).

Alternatively you could edit the existing PCB. It is somewhat modularly designed. For the power stage, delete all the tracks coming from the CPU, but keep all the ones between the driver and other power stage components. Then it should be relatively easy to select and move around.

FYI EasyEDA has an odd behavior where the selection is “inclusive” (anything touched by the rectangle border gets selected) or “exclusive” (only things entirely inside the rectangle) depending on which direction you drag the selecting rectangle. After that you can only ctrl+click individual objects to add or remove them from the selection, so try to get most of the vias with the initial rectangle… it’s super tedious if you have to click them one by one. And if tracks are only partially selected, ctrl+click them a few times to select, deselect, and then reselect. Otherwise they get split into multiple tracks when moved and makes it harder to edit later.

You can delete the aux input snubbers. They’re probably not necessary in the first place, and definitely not unless you’re powering the lower voltage rails externally (e.g. tapping into the lower cells of a lipo battery) rather than using buck converters.

You can rearrange the 3V regulator and buck converter components depending on what fits best with your layout, but try to keep the LVBUCK_DIODE and HVBUCK_DIODE areas as small as possible (reduces noise). And don’t route signal lines under the inductors.

Every signal via should have a ground via placed as close as possible to it. This reduces noise problems because every signal has an accompanying return current in the ground plane, and when switching layers, the return current needs to travel to the other signal layer’s ground plane. Otherwise the electric field between the signal and return current expands to bridge the distance to the other ground plane and will contaminate and be contaminated by signals in other nearby tracks. Ideally you should have one ground via for every signal via, but 2 or 3 signals sharing a single ground via is a lot better than not having it at all.

1 Like

I think you said it pretty well: if I am going to change it I would probably be better off trying to use mayb ehte drv8316 board and a pico or something, unfortunately. The QVADRANS derivative was totally messed up. It doesn’t work. All I did was add another power output and some resistors to the mosfets, but there was one tiny error the autorouter made, which I didn’t catch even though I spent hours checking everything.

In the end either we make it modular from the beginning, or if any tiny change is needed and and you are nearly back at the beginning. I can’t even use the components that have been carefully chosen because I’d have to get all the routing and ringing issues etc. worked out all over again. I can’t do that, it would take three rounds of prototyping and I don’t have the money or time. Few people do.

So here new people remain, at square one. If I needed exactly exactly this, then it would be handy. Some people might. Most won’t. We really could use one general purpose well designed board. So few people need to design their own, rather than the situation where few people can find something ready to roll. Once we have that people will start selling them on aliexpress etc. too so people who can’t afford a whole batch of boards still have an option.