Simplefoc 2.1.1 vs 2.2.3 differences

Hi,
I am using a customized bldc driver board with stm32f103cb.
Driver is TI drv8313PWP, phase Current OPA is INA240A2.

I cloned the project with simplefoc @2.1.1, and I met some current measurement issue, so I updated the simplefoc lib to 2.2.3.
My main.cpp is not changed, but with 2.2.3, I can compile and download, but no PWM output, movement init failed. (even I try to add lib_archive = false, no PWM output).
when I changed to 2.1.1 lib, it works again.


What do you think?

Hey,

In platformio, the option

lib_archive = false

is required in your platformio.ini, you should not leave it out…

Hi Runger,

Yes, I tried with lib_archive = false on simplefoc@2.2.3, same result as not added.
I forgot to mention at my beginning thread.

The lib_archive option is needed. Please leave it.

Could you also add a configuration like:

build_flags = 
	-D SIMPLEFOC_STM32_DEBUG

to the platformio.ini, and add a line:

SimpleFOCDebug::enable(&Serial);

to your setup(). I assume you have serial output configured?

and then let us know the Serial output?

Hey @kuqn,

Can you also show us your code.
There were some API changes that might be causing that.
The biggest one (introduced at v2.2.2) being that the current_sense needs the driver to be linked to it.

here is the docs link:

Cheers,
Antun

Hi Runger,

added
build_flags =
-D SIMPLEFOC_STM32_DEBUG

I have serial output, so I don’t add SimpleFOCDebug::enable(&Serial);
Please help to check the snapshot below. one is ok with v2.1.1, one is not working with v2.2.3


Hi Antun,

Attached the code for your information.

#include <SimpleFOC.h>
#include <Arduino.h>

// Motor instance
BLDCMotor motor = BLDCMotor(7);
BLDCDriver3PWM driver = BLDCDriver3PWM(PB_4, PB_5, PB_0, PB_12);
Encoder encoder = Encoder(PA_8, PA_9, 1000);

// Interrupt routine intialisation
// channel A and B callbacks
void doA()
{ encoder.handleA(); }

void doB()
{ encoder.handleB(); }

void doI()
{ encoder.handleIndex(); }

// current sensor
InlineCurrentSense current_sense = InlineCurrentSense(0.01f, 50.0f, A0, A1);

// angle,velocity set point variable
float target_velocity = 0;
float target_angle = 0;

// instantiate the commander
Commander command = Commander(Serial);

void doTarget(char *cmd)
{ command.scalar(&target_velocity, cmd); }

void doMotor(char* cmd)
{ command.motor(&motor, cmd); }
     
void setup()
{

    // initialize encoder sensor hardware
    encoder.init();
    encoder.enableInterrupts(doA, doB);
    // link the motor to the sensor
    motor.linkSensor(&encoder);

    driver.init();
    // link the motor and the driver
    motor.linkDriver(&driver);
    // driver config
    // power supply voltage [V]
    driver.voltage_power_supply = 12;

    // link current sense and the driver
    // current_sense.driverAlign(&driver);
    
    // initialise magnetic sensor hardware
    current_sense.init();
    // link the motor to the sensor
    motor.linkCurrentSense(&current_sense);

    // aligning voltage [V]
    motor.voltage_sensor_align = 1.2;
    // if you are not using aligning voltage, you can set current limitation
    motor.phase_resistance = 0.35; // [Ohm]

    // index search velocity [rad/s]
    // motor.velocity_index_search = 3;
    // motor.foc_modulation = FOCModulationType::SpaceVectorPWM;

    // set motion control loop to be used
    //motor.controller = MotionControlType::velocity;
    motor.torque_controller = TorqueControlType::voltage;
    motor.controller = MotionControlType::angle;
    
    // set the inital target value
    // motor.target = 0.5;
    
    // default voltage_power_supply
    // internal res is 0.35 ou maximum current is 2A
    // maximum volts is 0.7
    // this is used for open loop
    // motor.voltage_limit = 0.7;
    
    //  maximal velocity of the position control
    motor.velocity_limit = 10;
    // motor.target = 0.1; // Volts 

    // contoller configuration
    // default parameters in defaults.h

    // velocity PI controller parameters
    motor.PID_velocity.P = 0.012;
    motor.PID_velocity.I = 0.04;
    //motor.PID_velocity.D = 0.001;
    // jerk control using voltage voltage ramp
    // default value is 300 volts per sec  ~ 0.3V per millisecond
    motor.PID_velocity.output_ramp = 1000;

    // velocity low pass filtering time constant
    motor.LPF_velocity.Tf = 0.01;
    motor.voltage_limit = 1;
    motor.current_limit = 2; // Amps 
    
    // angle P controller
    motor.P_angle.P = 23;

    motor.P_angle.D = 0.01;

    // use monitoring with serial
    Serial.begin(115200);
    // comment out if not needed
    motor.useMonitoring(Serial);
    motor.monitor_downsample = 1; // setting sample rate, can up to 100+
    motor.monitor_variables = _MON_TARGET  | _MON_CURR_Q | _MON_CURR_D | _MON_VEL | _MON_ANGLE; 

    // invert phase b gain
    // current_sense.gain_b *=-1;
    // skip alignment
    // current_sense.skip_align = true;

    // initialize motor
    motor.init();
    // align encoder and start FOC
    motor.initFOC();
    
    motor.target = 27;
    // 订阅电机至commander
    command.add('M', doMotor,"motor");

    // add target command T
    // command.add('T', doTarget, "target_velocity");
    Serial.println("Motor ready.");
    Serial.println("Set the target using serial terminal:");
    _delay(1000);
}

void loop()
{
    // main FOC algorithm function
    // the faster you run this function the better
    // Arduino UNO loop  ~1kHz
    // Bluepill loop ~10kHz
    motor.loopFOC();

    // Motion control function
    // velocity, position or voltage (defined in motor.controller)
    // this function can be run at much lower frequency than loopFOC() function
    // You can also use motor.move() and set the motor.target in the code
    // motor.move(target_velocity);
    motor.move();
    // function intended to be used with serial plotter to monitor motor variables
    // significantly slowing the execution down!!!!
    motor.monitor();

    // user communication
    command.run();
  
    // test current
    //PhaseCurrent_s currents = current_sense.getPhaseCurrents();
    //float current_magnitude = current_sense.getDCCurrent();

    //Serial.print(currents.a * 1000); // milli Amps
    //Serial.print("\t");
    //Serial.print(currents.b * 1000); // milli Amps
    //Serial.print("\t");
    //Serial.print(currents.c * 1000); // milli Amps
    //Serial.print("\t");
    //Serial.println(current_magnitude * 1000); // milli Amps

    //test encoder
    //encoder.update();
    // display the angle and the angular velocity to the terminal
    //Serial.print(encoder.getAngle());
    //Serial.print("\t");
    //Serial.println(encoder.getVelocity());

}

By the way, the reason I upgraded from 2.1.1 to 2.2.3 is I found when I am using 2.1.1, current Iq is random and Id is not near 0. (This is in motor stopped status).
This made me can not use current foc control.
motor.torque_controller = TorqueControlType::foc_current;

I am doubting firmware problem, So I try to upgrade the firmware.

Hey, I think Antun was correct, you’re missing the current_sense.linkDriver(&driver);

See the docs at: Inline Current Sense | Arduino-FOC
there has been a change in version 2.2.2 of SimpleFOC.

I’m not 100% sure why this would result in the error you’re seeing, but best to fix this and try again…

Hi Runger,

Yes, I added current_sense.linkDriver(&driver). Still not work.

Hi Runger,

I am doing more tests today, when I used 2.1.1 lib, changed a motor like this.

捕获

It does not work, MCU serial output is similiar with 2.2.3.

But this motor works on b-g431-esc1 EVB.

I doubt whether there is something wrong with my H/W? drv8813 issue?

Hi,

Please add the build flag:

build_flags = 
	-D SIMPLEFOC_STM32_DEBUG

to platformio.ini, and please put the following code right at the beginning of your setup() method, and remove the Serial.begin() you have later in the code:

Serial.begin(115200);
SimpleFOCDebug::enable(&Serial);
delay(3000);

And then please send us the debug output from Serial… in this way we can see the output from the driver initialization and can check it is ok.

Hi Runger,

Thanks for your help.
Attached the log. As my code enables log output.
motor.monitor_downsample = 100; // setting sample rate, can up to 100+
// motor.monitor_variables = _MON_TARGET | _MON_CURR_Q | _MON_CURR_D | _MON_VEL | _MON_ANGLE;

So, after init fails, uart continues to output motor monitor data.

[21:22:35.722]ÊÕ¡û¡ôýMOT: Monitor enabled!
MOT: Init

[21:22:36.233]ÊÕ¡û¡ôMOT: Enable driver.

[21:22:37.225]ÊÕ¡û¡ôMOT: Align sensor.

[21:22:39.433]ÊÕ¡û¡ôMOT: Failed to notice movement

[21:22:39.950]ÊÕ¡û¡ôMOT: Init FOC failed.
Motor ready.
Set the target using serial terminal:

[21:22:43.281]ÊÕ¡û¡ô27.0000 -2.04 5.87 0.0000 193.9148
27.0000 -1.23 4.45 0.0000 193.9148
27.0000 -1.48 4.90 0.0000 193.9148
27.0000 0.57 1.36 0.0000 193.9148
27.0000 -0.44 0.59 0.0000 193.9148
27.0000 -2.82 1.25 0.0000 193.9148
27.0000 -2.48 0.43 0.0000 193.9148
27.0000 -2.36 1.83 0.0000 193.9148
27.0000 -2.20 0.63 0.0000 193.9148
27.0000 -2.11 -0.05 0.0000 193.9148
27.0000 -2.10 0.82 0.0000 193.9148
27.0000 -2.08 0.44 0.0000 193.9148
27.0000 -2.06 -0.03 0.0000 193.9148
27.0000 -0.45 -1.13 0.0000 193.9148
27.0000 1.27 -2.31 0.0000 193.9148
27.0000 -0.38 -1.47 0.0000 193.9148
27.0000 -0.95 -1.19 0.0000 193.9148
27.0000 -1.37 1.56 0.0000 193.9148
27.0000 -1.61 0.77 0.0000 193.9148
27.0000 -1.76 0.26 0.0000 193.9148
27.0000 -1.88 -0.12 0.0000 193.9148
27.0000 -3.54 0.67 0.0000 193.9148
27.0000 -2.83 3.13 0.0000 193.9148
27.0000 -2.40 1.11 0.0000 193.9148
27.0000 -1.53 0.37 0.0000 193.9148
27.0000 15.30 -9.77 0.0000 193.9148
27.0000 8.65 -6.27 0.0000 193.9148
27.0000 4.39 -1.43 0.0000 193.9148
27.0000 2.38 0.85 0.0000 193.9148
27.0000 0.38 3.12 0.0000 193.9148
27.0000 -0.16 3.74 0.0000 193.9148
27.0000 -1.08 1.59 0.0000 193.9148
27.0000 -1.56 3.76 0.0000 193.9148
27.0000 -1.63 3.11 0.0000 193.9148
27.000
[21:22:43.354]ÊÕ¡û¡ô0 0.63 0.08 0.0000 193.9148
27.0000 -0.10 1.67 0.0000 193.9148
27.0000 -1.01 0.59 0.0000 193.9148
27.0000 -1.23 0.32 0.0000 193.9148
27.0000 -1.60 -0.13 0.0000 193.9148
27.0000 -2.85 1.77 0.0000 193.9148
27.0000 -2.43 0.54 0.0000 193.9148
27.0000 -2.28 0.07 0.0000 193.9148
27.0000 -2.19 2.07 0.0000 193.9148
27.0000 -2.13 1.01 0.0000 193.9148
27.0000 -2.10 0.47 0.0000 193.9148
27.0000 -2.07 -0.02 0.0000 193.9148
27.0000 -2.06 -0.17 0.0000 193.9148
27.0000 -2.05 -0.41 0.0000 193.9148
27.0000 -2.04 -0.52 0.0000 193.9148
27.0000 -2.04 -0.54 0.0000 193.9148
27.0000 -2.04 -4.00 0.0000 193.9148
27.0000 -1.21 -3.99 0.0000 193.9148
27.0000 -1.53 -0.15 0.0000 193.9148
27.0000 -1.70 1.84 0.0000 193.9148
27.0000 -1.84 3.50 0.0000 193.9148
27.0000 1.00 3.04 0.0000 193.9148
27.0000 1.37 2.98 0.0000 193.9148
27.0000 2.53 -0.59 0.0000 193.9148
27.0000 1.73 -0.60 0.0000 193.9148
27.0000 -0.10 -0.62 0.0000 193.9148
27.0000 -0.44 -0.62 0.0000 193.9148
27.0000 -1.22 -0.63 0.0000 193.9148
27.0000 1.29 -2.33 0.0000 193.9148

Hi, no unfortunately this does not include the output from the driver.init()

Please enable the debug log at the beginning of the setup() method…

Hi Runger,

I got a snapshot; The output was same as before.

Ok, this is not normal… if you have all the options:

lib_archive = false
build_flags =
	-D SIMPLEFOC_STM32_DEBUG

and if your MCU is a STM32 MCU, then you should be getting more debug output from the driver.init() call.

Hi Runger,
I did some testing and verification.

  1. I re-created PlatformIO project, and cloned Simplefoc lib 2.1.1 and 2.2.3 from github, and used my application code, same result as before.
  2. When I used 2.2.3, I found when power-on, the DRV8313 will quickly go into fault mode, Drv8313 Pin 18 /FAULT went 0 from 3.3V. Power consumption is 45mA.
  3. When I used Simplefoc lib 2.1.1, the motor works, but phase current is high, motor is a little hot. total board power consumption is 222mA.
  4. When I used b-g431-ecs board, power consumption was 60-70mA when motor works.

What do you think ?

Hi @kuqn ,

I really like your small driver board, I think it would be good to get it working.

I can’t really understand why we can’t see the debug output on your setup. It would be really helpful to see it, to understand how the pins are being configured.

Are you on the newest version of the STM32 platform files?

Would you mind sharing again the platformio.ini and main.cpp files you are using for your last tests?

Another test you can do is to temporarily remove the current sensing code - in MotionControlType::angle it is not used anyway, so you can remove it and see if the problem goes away.

Another test you can do is to clone not the 2.2.3 version of the library, but the dev branch version - this is the most up-to-date version of the code.

Hi Runger,

The board is designed by a maker, I am studying with his board.

He did many cool diy design there.

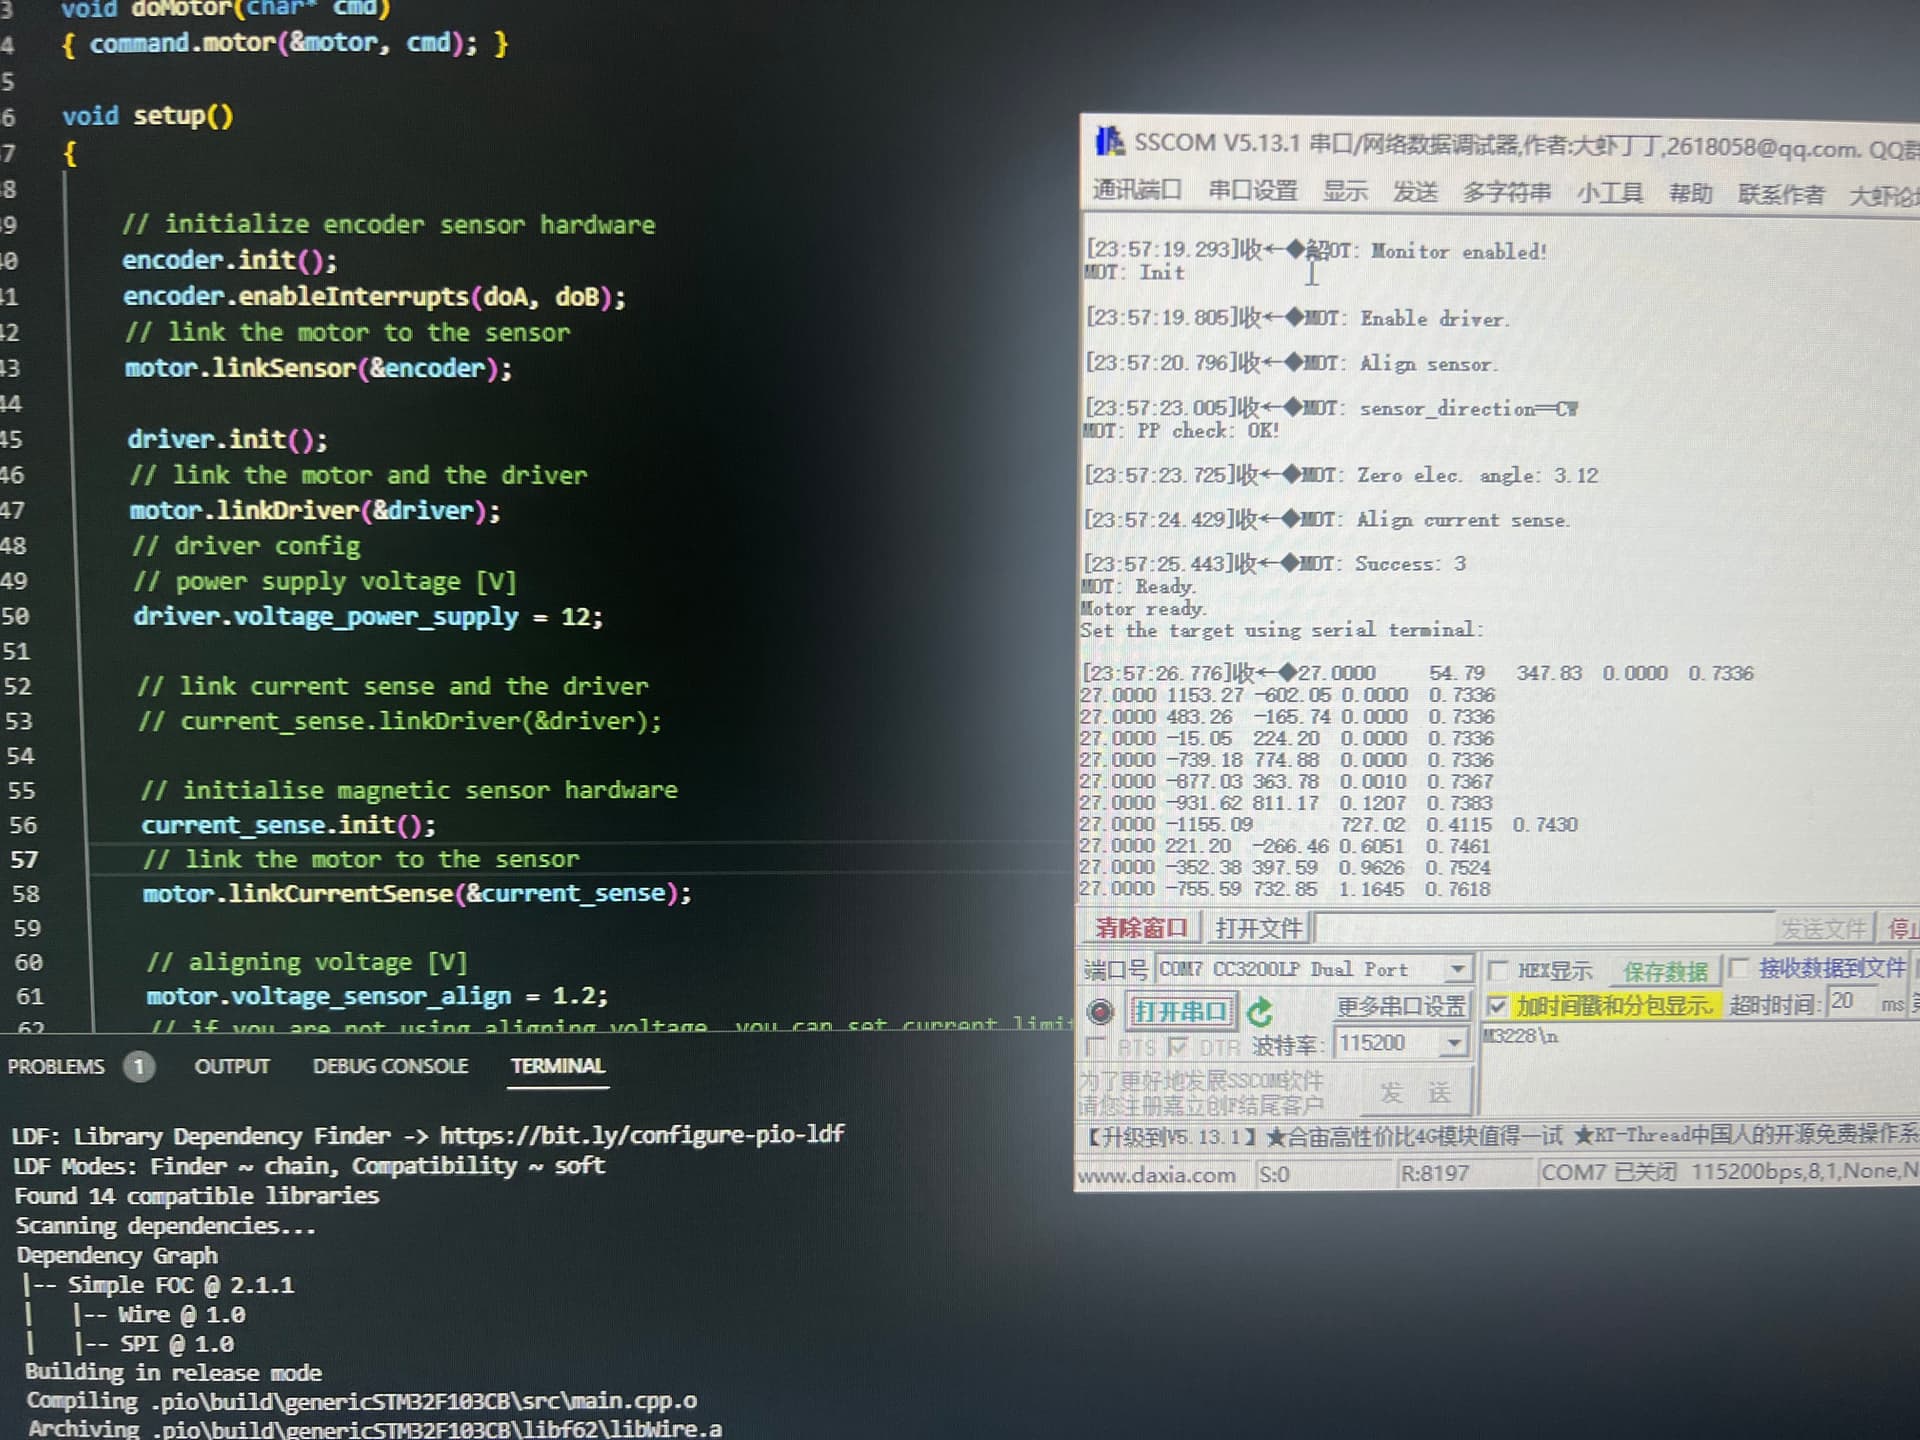
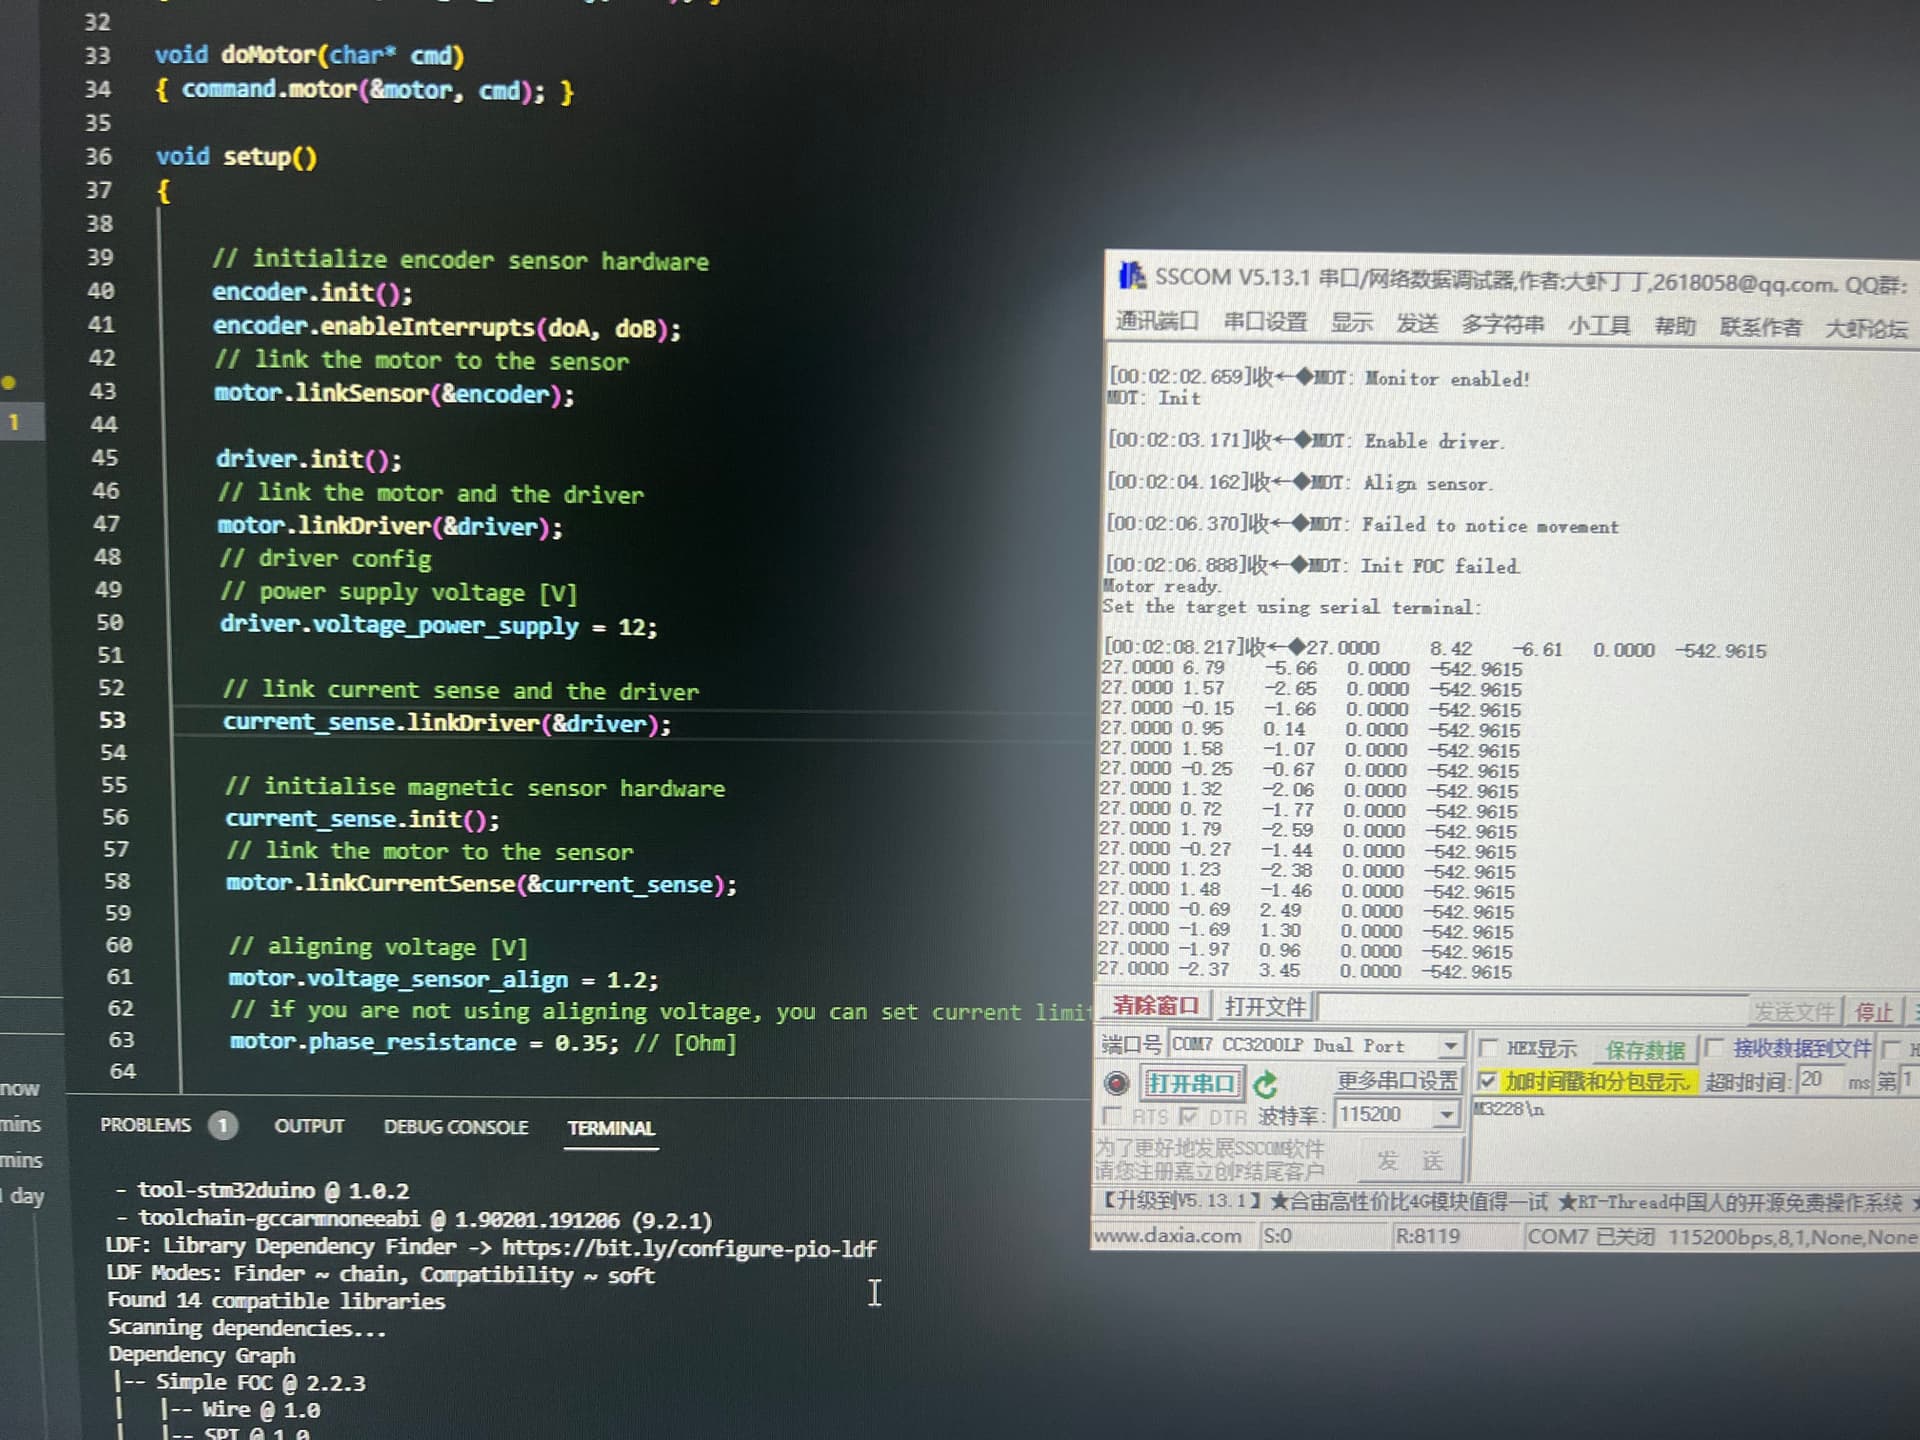
I re-install the platformio with new packages, using 2.2.3 version dev code, issue is the same, still no debug log output…

Here is my code.

#include <SimpleFOC.h>
#include <Arduino.h>

// Motor instance
BLDCMotor motor = BLDCMotor(7);
BLDCDriver3PWM driver = BLDCDriver3PWM(PB_4, PB_5, PB_0, PB_12);
Encoder encoder = Encoder(PA_8, PA_9, 1000);

// Interrupt routine intialisation
// channel A and B callbacks
void doA()
{ encoder.handleA(); }

void doB()
{ encoder.handleB(); }

void doI()
{ encoder.handleIndex(); }

// current sensor
InlineCurrentSense current_sense = InlineCurrentSense(0.01f, 50.0f, A0, A1);

// angle,velocity set point variable
float target_velocity = 0;
float target_angle = 0;

// instantiate the commander
Commander command = Commander(Serial);

void doTarget(char *cmd)
{ command.scalar(&target_velocity, cmd); }

void doMotor(char* cmd)
{ command.motor(&motor, cmd); }

void setup()
{

// use monitoring with serial
Serial.begin(115200);
SimpleFOCDebug::enable(&Serial);
_delay(100);

// initialize encoder sensor hardware
encoder.init();
encoder.enableInterrupts(doA, doB);
// link the motor to the sensor
motor.linkSensor(&encoder);

driver.init();
// link the motor and the driver
motor.linkDriver(&driver);
// driver config
// power supply voltage [V]
driver.voltage_power_supply = 12;

// link current sense and the driver
// current_sense.linkDriver(&driver);

// initialise magnetic sensor hardware
//current_sense.init();
// link the motor to the sensor
//motor.linkCurrentSense(&current_sense);

// aligning voltage [V]
motor.voltage_sensor_align = 1.5;
// if you are not using aligning voltage, you can set current limitation
motor.phase_resistance = 0.35; // [Ohm]
//motor.phase_resistance = 3.5; // [Ohm]

// index search velocity [rad/s]
// motor.velocity_index_search = 3;
// motor.foc_modulation = FOCModulationType::SpaceVectorPWM;

// set motion control loop to be used
//motor.controller = MotionControlType::velocity;
motor.torque_controller = TorqueControlType::voltage;
// motor.controller = MotionControlType::torque;

// set the inital target value
// motor.target = 0.5;

// default voltage_power_supply
// internal res is 0.35 ou maximum current is 2A
// maximum volts is 0.7
// this is used for open loop
// motor.voltage_limit = 0.7;

//  maximal velocity of the position control
motor.velocity_limit = 10;
// motor.target = 0.1; // Volts 

// contoller configuration
// default parameters in defaults.h

// velocity PI controller parameters
motor.PID_velocity.P = 0.012;
motor.PID_velocity.I = 0.04;
//motor.PID_velocity.D = 0.001;
// jerk control using voltage voltage ramp
// default value is 300 volts per sec  ~ 0.3V per millisecond
motor.PID_velocity.output_ramp = 1000;

// velocity low pass filtering time constant
motor.LPF_velocity.Tf = 0.01;
motor.voltage_limit = 0.8;
motor.current_limit = 0.5; // Amps 

// angle P controller
motor.P_angle.P = 23;

motor.P_angle.D = 0.01;

// comment out if not needed
motor.useMonitoring(Serial);
motor.monitor_downsample = 1; // setting sample rate, can up to 100+
motor.monitor_variables = _MON_TARGET  | _MON_CURR_Q | _MON_CURR_D | _MON_VEL | _MON_ANGLE; 

// invert phase b gain
// current_sense.gain_b *=-1;
// skip alignment
// current_sense.skip_align = true;

// initialize motor
motor.init();
// align encoder and start FOC
motor.initFOC();

motor.target = 0.5;

// 订阅电机至commander
command.add('M', doMotor,"motor");

// add target command T
// command.add('T', doTarget, "target_velocity");
Serial.println("Motor ready.");
Serial.println("Set the target using serial terminal:");
_delay(300);

}

void loop()
{
// main FOC algorithm function
// the faster you run this function the better
// Arduino UNO loop ~1kHz
// Bluepill loop ~10kHz
motor.loopFOC();

// Motion control function
// velocity, position or voltage (defined in motor.controller)
// this function can be run at much lower frequency than loopFOC() function
// You can also use motor.move() and set the motor.target in the code
// motor.move(target_velocity);
motor.move();
// function intended to be used with serial plotter to monitor motor variables
// significantly slowing the execution down!!!!
motor.monitor();

// user communication
command.run();

// test current
//PhaseCurrent_s currents = current_sense.getPhaseCurrents();
//float current_magnitude = current_sense.getDCCurrent();

//Serial.print(currents.a * 1000); // milli Amps
//Serial.print("\t");
//Serial.print(currents.b * 1000); // milli Amps
//Serial.print("\t");
//Serial.print(currents.c * 1000); // milli Amps
//Serial.print("\t");
//Serial.println(current_magnitude * 1000); // milli Amps

//test encoder
//encoder.update();
// display the angle and the angular velocity to the terminal
//Serial.print(encoder.getAngle());
//Serial.print("\t");
//Serial.println(encoder.getVelocity());

}

Here is config file

[env:genericSTM32F103CB]

platform = ststm32

board = genericSTM32F103CB

framework = arduino

upload_protocol = stlink

debug_tool = stlink

upload_flags = -c set CPUTAPID 0x1ba01477

build_flags = -D SIMPLEFOC_STM32_DEBUG

lib_archive = false

Hello Runger, any comments ?