Button control of command.add('T', doTarget, "target velocity");

Howdy Smart People. I am looking to set up a few buttons to control command.add(‘T’, doTarget, “target velocity”);
My Arduino skills are lame at best, so I am inquiring if anyone has set up a few momentary buttons to fire off velocity commands.
I am finishing a turntable that is working quite well in open loop but need to set up zero, 33, 45 and 78 speeds. Currently at 33 1/3 the turntable is exceeding expectations.

Thanks

Hi,

This will not be too difficult :slight_smile:

Basic code to react to a button might look like this:

// define some constants for the 
#define SPEED33      3.5f


void loop() {
  // button on pin 15
  if (digitalRead(15)==HIGH) { // high state means on
     motor.target = SPEED33; // this button sets the speed to 33.3rpm
   }

  ...
}

this code is still very primitive, but you get the idea.

  • if you’re using an external variable in your doTarget() rather than setting motor.target directly, that’s fine too, just set that one via the button
  • you probably don’t need to check the buttons every time through the loop. Build in a counter or timestamp and check them only 10x per second or so
  • you may also need to add some “debouncing” or take some measures like requiring a minimum time between accepting new values - this is usually needed to improve the useability for the user, since pressing the button often results in multiple triggering of the actions if you’re not careful. Depending on how your code works this can be confusing/difficult for the user.

Many, many thanks. I will get on that. There is no way this project could be happening without SimpleFOC. There are other sine wave bldc drive solutions, but nothing as simple, solid and cost effective.

1 Like

Jazzboy - good to see you on this forum. I have seen your turntable on DIYAudio. Nice job.

You probably also want to add up/down buttons or a rotary encoder to adjust the motor speed slightly around the preset motor speed to get to exactly 33.33 platter speed. Belt wear, size, etc can affect the platter speed substantially. (I am working on a similar turntable project as well).

I have also considered putting an encoder on the platter itself, and monitoring that to calculate platter speed in real time, and send adjustments over to the motor controller during initial spin up to make sure it is dialed in. Kind of like a modern day Quartz Lock.

2 Likes

Hey,

You could certainly do what you describe! You could run SimpleFOC in torque-voltage mode, while running another velocity control loop on the platter’s sensor…
You could re-use the SimpleFOC Sensor, PID and LPF classes for this purpose.

1 Like

Oh interesting! Are you suggesting that instead of Open Loop Velocity control on the motor running the pulley and belt, instead use Torque Mode closed loop? And then use the encoder on the platter (which runs at say 1/10th the speed of the motor) to provide feedback to the torque control on the motor to regulate speed of the platter?

1 Like

Many thanks. Very good ideas. For now, my programming chops are weak but as I get better, I will implement more control. The Quartz lock idea is very good.

1 Like

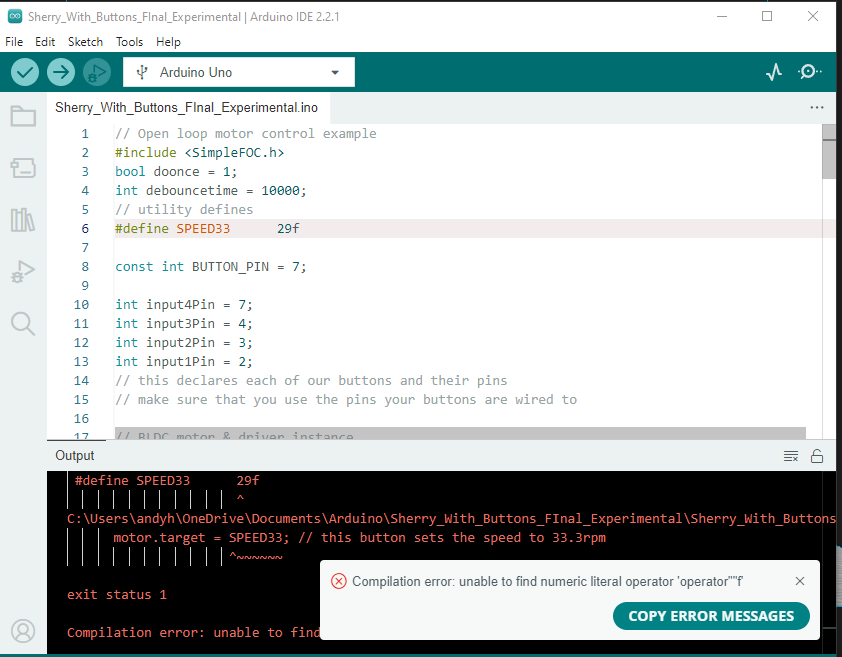
Hi Richard, sorry to be a pest but I just can’t get float variables past the compiler (#define SPEED33 3.5f)

I have a working sketch but it it somewhat brutal haha! I am not calling the speed externally, instead it’s part of the loop. The motor.disable and motor.enable are keepers via momentary buttons, but not sure about having constantly sent out motor.move messages using a toggle switch. Buttons are now LOW for pullup and connected to ground. So, it works really well but not sure if this a proper way to do it. Thanks!

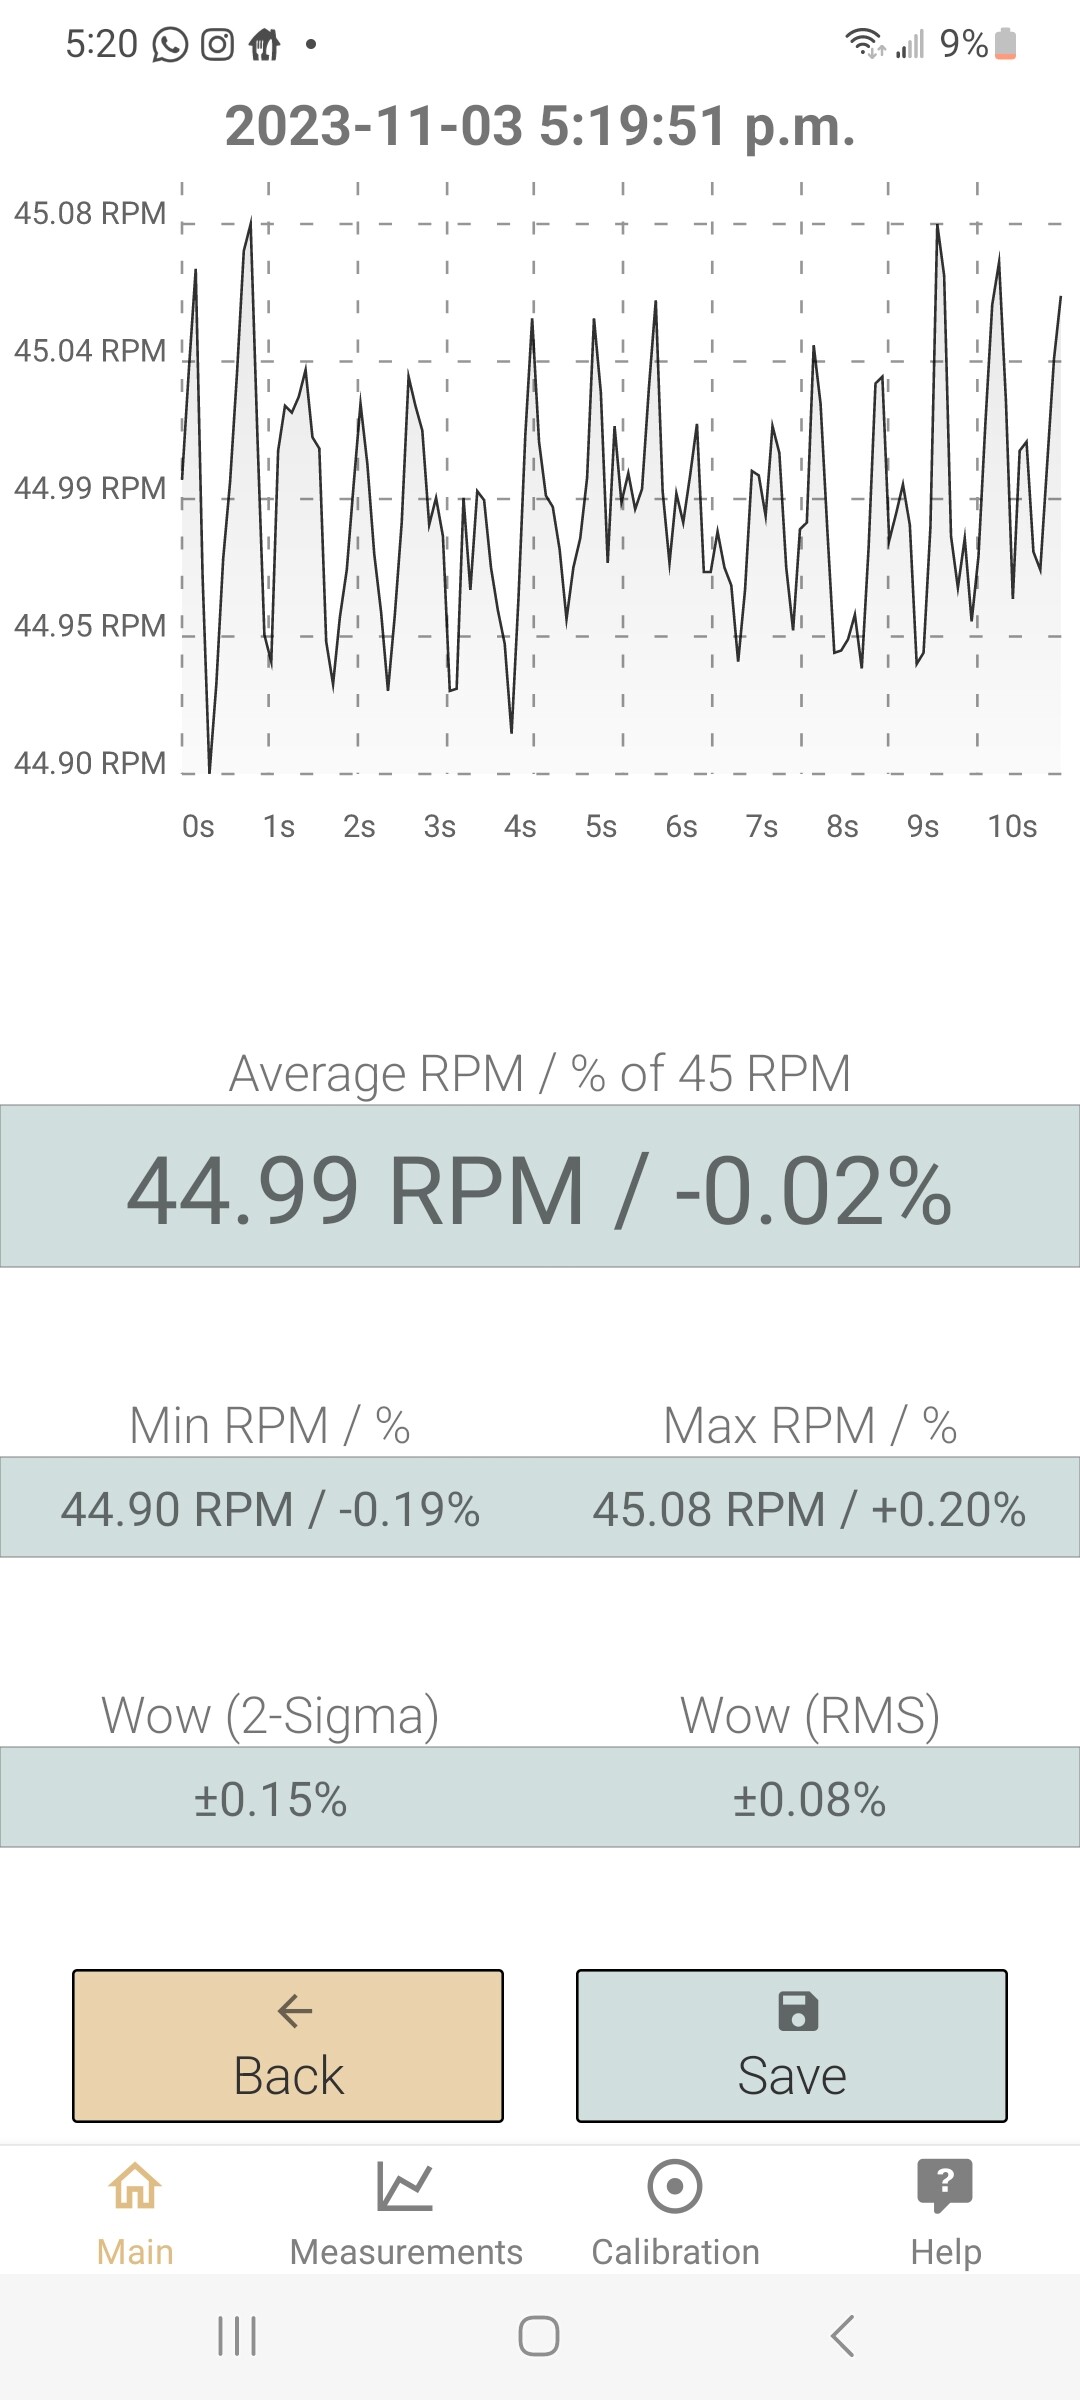
Just added a funny vid.

// Open loop motor control example
#include <SimpleFOC.h>
bool doonce = 1;
int debouncetime = 10000;

const int BUTTON_PIN = 7;

int input4Pin = 7;
int input3Pin = 4;
int input2Pin = 3;
int input1Pin = 2;
// this declares each of our buttons and their pins
// make sure that you use the pins your buttons are wired to

// BLDC motor & driver instance
// BLDCMotor motor = BLDCMotor(pole pair number);
BLDCMotor motor = BLDCMotor (7, 5, 255);
// BLDCDriver3PWM driver = BLDCDriver3PWM(pwmA, pwmB, pwmC, Enable(optional));
BLDCDriver3PWM driver = BLDCDriver3PWM(9, 5, 6, 8);

// Stepper motor & driver instance
//StepperMotor motor = StepperMotor(50);
//StepperDriver4PWM driver = StepperDriver4PWM(9, 5, 10, 6, 8);

void setup() {
pinMode(input4Pin, INPUT_PULLUP);
pinMode(input3Pin, INPUT_PULLUP);
pinMode(input2Pin, INPUT_PULLUP);
pinMode(input1Pin, INPUT_PULLUP); // these lines declare each of the buttons as an input

// driver config
// power supply voltage [V]
driver.voltage_power_supply = 12;
// limit the maximal dc voltage the driver can set
// as a protection measure for the low-resistance motors
// this value is fixed on startup
driver.voltage_limit = 12;
driver.init();
// link the motor and the driver
motor.linkDriver(&driver);

// limiting motor movements
// limit the voltage to be set to the motor
// start very low for high resistance motors
// current = voltage / resistance, so try to be well under 1Amp
motor.voltage_limit = 4
; // [V]

// open loop control config
motor.controller = MotionControlType::velocity_openloop;

// init motor hardware
motor.init();

Serial.begin(115200);
Serial.println(“Motor ready!”);
Serial.println(“Set target velocity [rad/s]”);
_delay(1000);
}

void loop() {

 // read the state of the switch/button:

int buttonState = digitalRead(BUTTON_PIN);

// print out the button’s state
Serial.println(buttonState);

// button on pin 2
if (digitalRead(2)==LOW) { // high state means on
motor.disable(); // stops motor
}
// button on pin 3
if (digitalRead(3)==LOW) { // high state means on
motor.move(29.12); // this button sets the speed to 33.3rpm
}

// button on pin 4
if (digitalRead(4)==LOW) { // high state means on
motor.move(39.3); // this button sets the speed to 45rpm
}
// button on pin 7
if (digitalRead(7)==LOW) { // high state means on
motor.enable(); // starts motor
doonce = 1;
delay(debouncetime);
}

}


You might want to use interrupts, which are handled without needing to check the input (the mcu has some hardware to tell it when something has happened on the pin):

In this case, for the buttons, you only need to check when the trigger is rising (if it’s normally low) and for the toggle, you should check on a change of state. See the example in the link for an idea of how it works.

1 Like

Thanks will check it out. Trying to keep thing as simple as possible.

No problem, but I am not sure what you mean here. What error is the compiler giving you?

It looks simple and effective. I think there is some concern around button “bouncing” but if its working then perfect.

Thanks for the reply. This is the error I get if I add a definition with f.

I believe it has to be 29.0f as the ‘f’ is only allowed on floating point numbers.

1 Like

Thanks, that had to be it, but i need to fine tune the speed so i guess my options are limited.

I’m not sure I get you there… what’s limiting your options in this case?

I need numbers like 29.177 to accurately tune to 33.3rpm.

No problem there 29.177f is a valid float, and probably within the range of float precision :slight_smile:

You can print floats with greater precision than the default 2 digits:

Serial.println(floatval, 6); // 6 digits after the decimal point

Internally the system always works with the full precision of the datatype, which is 32 bits for the floats. 8 bits are for the exponent, 23 bits for the “mantissa” (digits) and 1 bit is the sign, positive or negative.

1 Like