Hi guys,
We the recent heatwaves one can be stuck at home with no air conditioning and no fan.
For those having a BLDC motor and a drone prop, SimpleFOC can provide a solution ![]()
#include <Arduino.h>
#include <SimpleFOC.h>
#include "current_sense/hardware_specific/stm32/stm32_mcu.h"
#include <encoders/MXLEMMING_observer/MXLEMMINGObserverSensor.h>
// BLDC motor & driver instance
BLDCMotor motor = BLDCMotor(11, 0.29, 380.0f, 0.00009f, 0.00006f); // sunnysky
BLDCDriver3PWM driver = BLDCDriver3PWM(D6, D10, D5, D8);
// inline current sensor instance
// INA240-A1 + a parallel of 4mOhm resistors
LowsideCurrentSense current_sense = LowsideCurrentSense(0.002, 20.0f, A1, _NC, A2);
// sensorless observer
MXLEMMINGObserverSensor sensor = MXLEMMINGObserverSensor(motor);
// commander communication instance
Commander command = Commander(Serial);
void doMotor(char* cmd){ command.motor(&motor, cmd); }
// STEMMA interface for potentiometer and the screen
#include "Adafruit_seesaw.h"
#include <Adafruit_SSD1306.h>
#define SCREEN_WIDTH 128 // OLED display width, in pixels
#define SCREEN_HEIGHT 64 // OLED display height, in pixels
#define OLED_RESET -1 // Reset pin # (or -1 if sharing Arduino reset pin)
#define SCREEN_ADDRESS 0x3D ///< See datasheet for Address; 0x3D for 128x64, 0x3C for 128x32
#define DEFAULT_I2C_ADDR 0x30
#define ANALOGIN 18
Adafruit_SSD1306 display(SCREEN_WIDTH, SCREEN_HEIGHT, &Wire, OLED_RESET);
Adafruit_seesaw seesaw(&Wire);
void printToDisplay(const String &line1, const String &line2 = "") {
display.clearDisplay();
display.setTextSize(1); // Normal 1:1 pixel scale
display.setTextColor(SSD1306_WHITE); // Draw white text
display.setCursor(0,0); // Start at top-left corner
display.println(line1);
display.println(line2);
display.display();
}
void setup() {
// use monitoring with serial
Serial.begin(115200);
// enable more verbose output for debugging
// comment out if not needed
SimpleFOCDebug::enable(&Serial);
// connect the STEMMA interface
while (!seesaw.begin(DEFAULT_I2C_ADDR, -1, false)) {
Serial.println(F("seesaw not found!"));
delay(1);
}
// SSD1306_SWITCHCAPVCC = generate display voltage from 3.3V internally
if(!display.begin(SSD1306_SWITCHCAPVCC, SCREEN_ADDRESS,false, false)) {
Serial.println(F("SSD1306 allocation failed"));
for(;;); // Don't proceed, loop forever
}
// Show initial display buffer contents on the screen --
// the library initializes this with an Adafruit splash screen.
display.display();
// Clear the buffer
display.clearDisplay();
// driver config
// power supply voltage [V]
driver.voltage_power_supply = 20;
driver.init();
// link driver
motor.linkDriver(&driver);
// link current sense and the driver
current_sense.linkDriver(&driver);
// set control loop type to be used
motor.controller = MotionControlType::torque;
// controller configuration based on the control type
motor.PID_velocity.P = 0.05f;
motor.PID_velocity.I = 1;
motor.PID_velocity.D = 0;
// default voltage_power_supply
motor.voltage_limit = 12;
// velocity low pass filtering time constant
motor.LPF_velocity.Tf = 0.01f;
// angle loop controller
motor.P_angle.P = 20;
// angle loop velocity limit
motor.velocity_limit = 20;
// comment out if not needed
motor.useMonitoring(Serial);
motor.monitor_downsample = 0; // disable intially
motor.monitor_variables = _MON_TARGET | _MON_VEL | _MON_ANGLE; // monitor target velocity and angle
// current sense init and linking
current_sense.init();
motor.linkCurrentSense(¤t_sense);
motor.controller = MotionControlType::torque;
motor.torque_controller = TorqueControlType::foc_current;
motor.voltage_limit = 6;
motor.linkSensor(&sensor);
motor.sensor_direction= Direction::CW;
motor.zero_electric_angle = 0;
// initialise motor
motor.init();
// align encoder and start FOC
motor.initFOC();
motor.tuneCurrentController(100.0);
// set the inital target value
motor.target = 0;
// subscribe motor to the commander
//command.add('T', doMotion, "motion control");
command.add('M', doMotor, "motor");
// Run user commands to configure and the motor (find the full command list in docs.simplefoc.com)
Serial.println("Motor ready.");
// create a hardware timer
// For example, we will create a timer that runs at 10kHz on the TIM5
HardwareTimer* timer = new HardwareTimer(TIM8);
// Set timer frequency to 20kHz
timer->setOverflow(20000, HERTZ_FORMAT);
// add the loopFOC and move to the timer
timer->attachInterrupt([](){
// call the loopFOC and move functions
motor.loopFOC();
motor.move();
});
// start the timer
timer->resume();
_delay(1000);
}
int t = 0;
uint32_t last_loop_timestamp_us = 0;
void loop() {
// // read the potentiometer
uint16_t slide_val = seesaw.analogRead(ANALOGIN);
//Serial.println(slide_val);
printToDisplay("Slide Potentiometer", "Value: " + String(slide_val/1023.0f * 100.0f, 2) + "%");
motor.target = (slide_val / 1023.0f) * 1.5f; // set target velocity based on potentiometer value
// user communication
command.run();
}
Here are some photos:
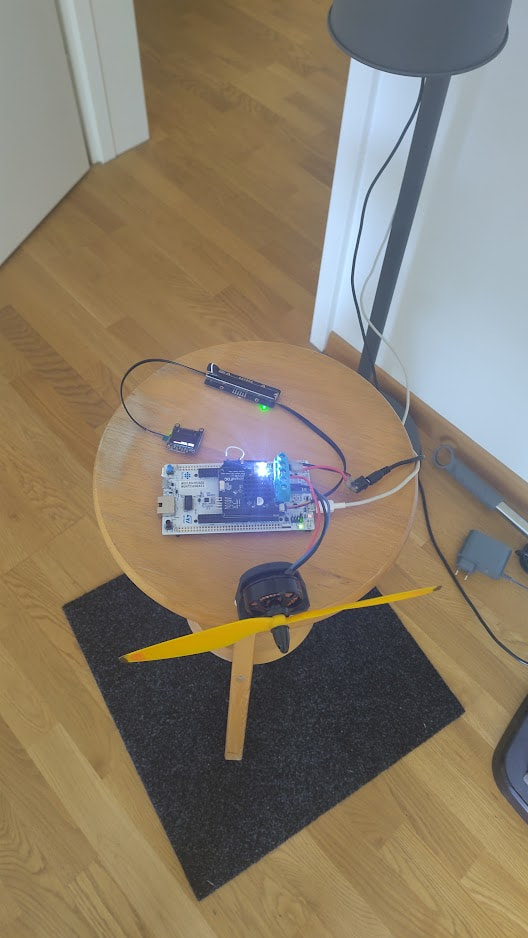
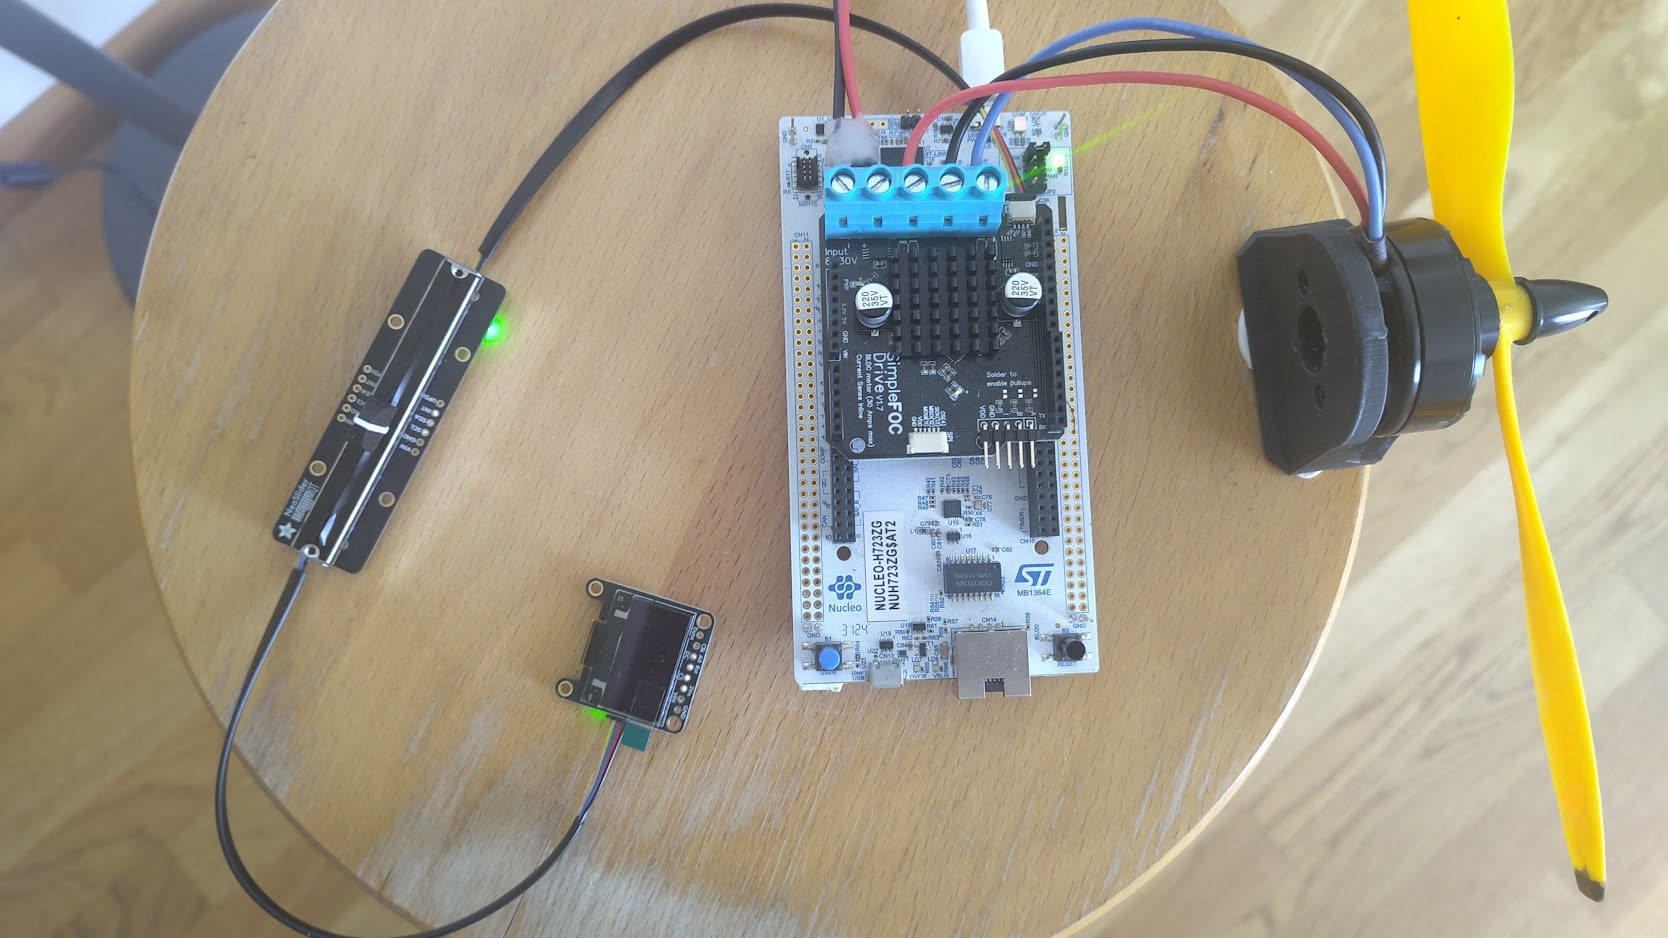
The hardware is:
- SimpleFOC Drive shield
- Stemma potentiometer + a screen
- stm32h7 nucleo board (can be any other nucleo here)
- Random sunnysky motor X4108S
- Some random drone propeller
I’m very happy with it actually. It’s working more or less continuously for at least 4-5h each one of the last couple of days. Of course the noise makes it more similar to an airplane taking off than a room fan, but still. ![]()
Someone motivated to make an enclosure and make the SimpleFOCFan™ ![]()
![]()
https://docs.simplefoc.com/tuning_current_loop#automatic-current-pi-tuning
– Candas1