# Mounting the magnet onto the motor
**URL:** https://community.simplefoc.com/t/mounting-the-magnet-onto-the-motor/1020
**Category:** Uncategorized
**Created:** [June 28, 2021, 6:20pm UTC](https://community.simplefoc.com/t/mounting-the-magnet-onto-the-motor/1020 "2021-06-28T18:20:58Z")
**Posts on this page:** 12
**Page:** 1
### Author:  [@wimalopaan](https://community.simplefoc.com/u/wimalopaan)
#### Post date: [June 28, 2021, 6:20pm UTC](https://community.simplefoc.com/t/mounting-the-magnet-onto-the-motor/1020/1 "2021-06-28T18:20:58Z")
What is the best way to mount the magnet onto the motor axis?
What is the best way to fix the magnetic-sensor-board.
Are there any 3d-printable sensor-housings or things like that for specific gimbal or other motors.
Would appreciate any help.
Thanks!
---
### Author:  [@JorgeMaker](https://community.simplefoc.com/u/JorgeMaker)
#### Post date: [June 29, 2021, 1:12am UTC](https://community.simplefoc.com/t/mounting-the-magnet-onto-the-motor/1020/2 "2021-06-29T01:12:39Z")
It depends on your motor but at leas for me it generally works with a little bit of glue.
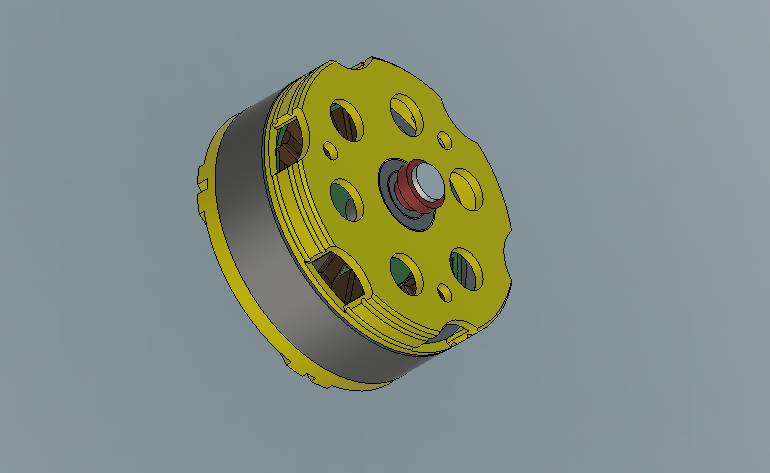
If you have a shallow shat you can design a specific magnet holder. …something like this:

---
### Author:  [@Valentine](https://community.simplefoc.com/u/Valentine)
#### Post date: [June 29, 2021, 2:19am UTC](https://community.simplefoc.com/t/mounting-the-magnet-onto-the-motor/1020/3 "2021-06-29T02:19:46Z")
> [@wimalopaan](#):
>
> best way to mount the magnet onto the motor axis
1. Quality, specialized two-part metal epoxy. Do not use superglue, or any other household grade glue, it degrades with time, or has different temperature expansion coefficient than metal and will crack with time. You must make sure the diametrically magnetized magnet is perfectly centered. I had a case where I bought a very expensive servo which misbehaved and when I opened it I discovered the magnet was off-center. Removing a glued magnet is nearly impossible because usually it involves heating which will immediately kill your Nd magnet, especially the cheap chinese ones, they turn into pumpkins at as low as 80oC (that’s lower than boiling water). Had to throw the servo away, because the magnet was so well glued inside the shaft I could not chisel it away without destroying the motor. Especially for motors, they get sometimes so hot, make sure you buy quality diametric magnets which can survive at least 100oC (boiling water). Buy a magnet, dunk it in boiling water, and check if it’s still good, better than gluing it first and finding it turns into a dud after a few days. Very common mistake.
2. As @JorgeMaker mentioned it may be a good idea to use a 3d printed insert, this way if you make a mistake, it’s trivial to pull the insert, scoop the magnet out with pliers and try again. And don’t heat the insert with a hot air gun to soften it, see #1. Also, 3d insert will give you the perfect center alignment.
> [@wimalopaan](#):
>
> best way to fix the magnetic-sensor-board.
1. Design your 3d and print it. May not be the answer you want but it’s the only one. There may be some holders out there on the multitude of 3d printing libraries, worth checking but this is so niche that i would be surprised if you find one that fits exactly your motor.
2. Many gumball motors come complete with a magnet, sensor and housing together, it may be best if you just buy the combo, it will save you a ton of headache. I am assuming you mean the angular hall sensors, not the three-hall sensored motors with the sensors inside the coils.
Hope that helps.
---
### Author:  [@wimalopaan](https://community.simplefoc.com/u/wimalopaan)
#### Post date: [June 29, 2021, 6:06am UTC](https://community.simplefoc.com/t/mounting-the-magnet-onto-the-motor/1020/4 "2021-06-29T06:06:28Z")
Looks nice.
Thank you!
---
### Author:  [@wimalopaan](https://community.simplefoc.com/u/wimalopaan)
#### Post date: [June 29, 2021, 6:07am UTC](https://community.simplefoc.com/t/mounting-the-magnet-onto-the-motor/1020/5 "2021-06-29T06:07:51Z")
Do you have a shop at hand where I can get gimbal-motor including a angular sensor? My googling did not reveal anything useful. Thanks in advance!!!
---
### Author:  [@Valentine](https://community.simplefoc.com/u/Valentine)
#### Post date: [June 29, 2021, 6:39am UTC](https://community.simplefoc.com/t/mounting-the-magnet-onto-the-motor/1020/6 "2021-06-29T06:39:25Z")
Small and relatively inexpensive
[https://shop.iflight-rc.com/gbm2804r-gimbal-motor-with-as5048a-encoder-and-slipring-pro1275?search=gimbal&sort=p.price&order=ASC](https://shop.iflight-rc.com/gbm2804r-gimbal-motor-with-as5048a-encoder-and-slipring-pro1275?search=gimbal&sort=p.price&order=ASC)
Large, powerful and expensive
> **[GM110-10 Gimbal Motor w/Encoder](https://shop.iflight.com/ipower-gimbal-motor-gm110-10-with-as5048a-encoder-pro1300?search=gimbal&sort=p.price&order=DESC)**
>
> The AS5048 is an easy-to-use 360° angle position sensor with a 14-bit high-resolution output. The maximum system accuracy is 0.05° assuming linearization and averaging is done by the external microcontroller. The IC measures the absolute position of...
Not sure if they all come with magnets though.
---
### Author:  [@wimalopaan](https://community.simplefoc.com/u/wimalopaan)
#### Post date: [June 29, 2021, 10:43am UTC](https://community.simplefoc.com/t/mounting-the-magnet-onto-the-motor/1020/7 "2021-06-29T10:43:02Z")
Thank you very much. I found some others now on AliExpress (PM3505, PM3510 and PM4315)
---
### Author:  [@wimalopaan](https://community.simplefoc.com/u/wimalopaan)
#### Post date: [October 24, 2023, 9:06am UTC](https://community.simplefoc.com/t/mounting-the-magnet-onto-the-motor/1020/8 "2023-10-24T09:06:29Z")
Two years later now 😉
Are there any goog ideas to mount magnet and sensorboard to RC-motors like e.g. this one:
> **[NTM Prop-Antrieb 50-60 Series 380kV / 2665W](https://hobbyking.com/de_de/propdrive-v2-5060-380kv-brushless-outrunner-motor.html?___store=de_de)**
>
> NTM Prop-Antrieb 50-60 Series 380kV / 2665W
---
### Author:  [@runger](https://community.simplefoc.com/u/runger)
#### Post date: [October 24, 2023, 9:45am UTC](https://community.simplefoc.com/t/mounting-the-magnet-onto-the-motor/1020/9 "2023-10-24T09:45:56Z")
It’s a good question! Can you take it apart and press the shaft down so it sticks out the back a little?
---
### Author:  [@wimalopaan](https://community.simplefoc.com/u/wimalopaan)
#### Post date: [October 24, 2023, 11:31am UTC](https://community.simplefoc.com/t/mounting-the-magnet-onto-the-motor/1020/10 "2023-10-24T11:31:23Z")
Perhaps, I tried that with other motors: on some motors the shaft is secured by a small screw, on others it is glued or shrinked into the outrunners “dome”.
For a 63mm BLDC I used a 20mm gimbal-motor with includes an AS5048 and mounted the both together back-to-back with two prop-mounts and some flexible axle in between.
---
### Author:  [@Anthony\_Douglas](https://community.simplefoc.com/u/Anthony_Douglas)
#### Post date: [October 29, 2023, 10:47pm UTC](https://community.simplefoc.com/t/mounting-the-magnet-onto-the-motor/1020/11 "2023-10-29T22:47:12Z")
I did as suggested by the very first post and it worked great. I just made a little 3d printed part, forced the magnet in to it’s hole with plumbing pliers, then forced the plastic bit into the motor. You should use petg, standard pla tends to crack over time with stress. Shoe goo can work as an adhesive, it is a rubber material after hardening so it will never crack and I think it’s butyl rubber so it’s good for longterm.
These things need to be “calibrated” for eccentricity etc due to inevitable misalignment of the magnet anyway so the mechanical imperfections are basically compensated for in software.
---
### Author:  [@Backflip](https://community.simplefoc.com/u/Backflip)
#### Post date: [August 31, 2026, 3:50pm UTC](https://community.simplefoc.com/t/mounting-the-magnet-onto-the-motor/1020/12 "2026-08-31T15:50:38Z")
I just want to suggest a design to fasten a 3D-printed coupling to a shaft or magnet. I have used it in a couple of project, but I have got no long time experience with it. I make two slits of 0.4 width in the plastic bushing and apply pressure by sewing machine thread wrapped around the bushing. Here is a couple of photos:
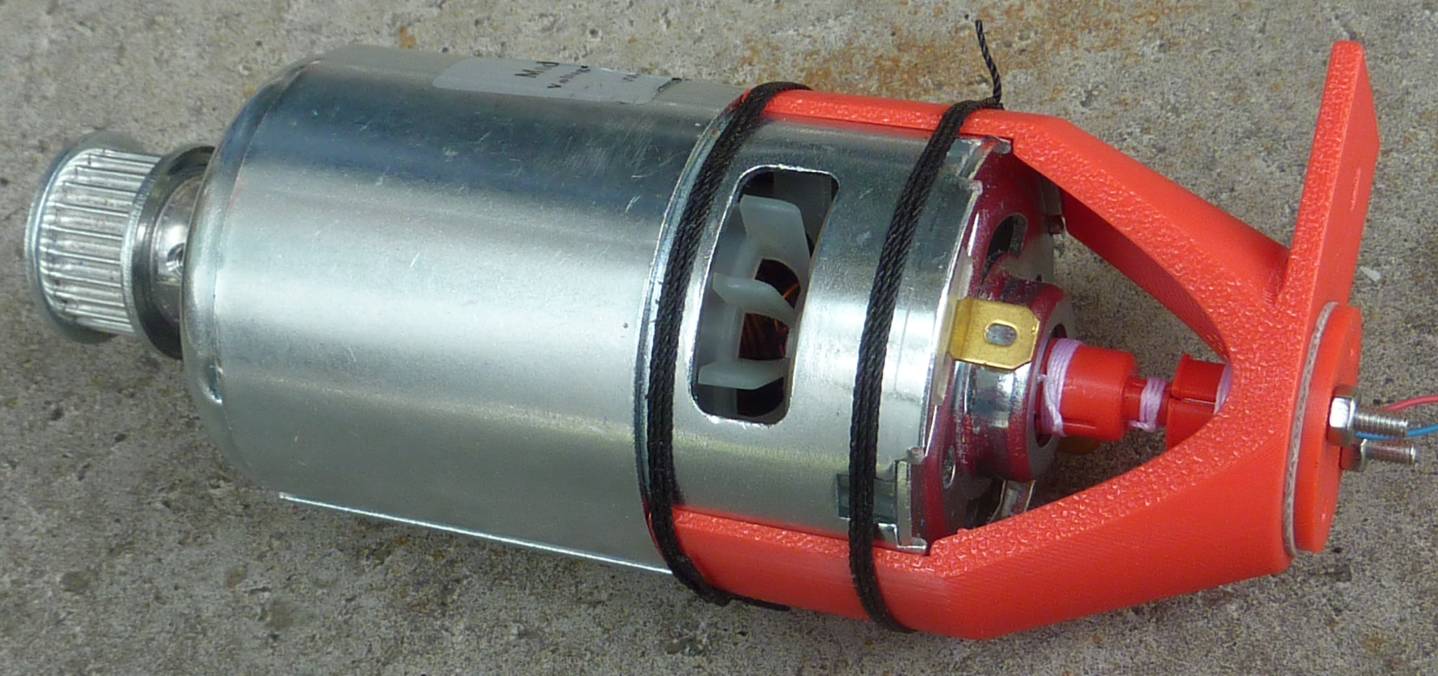
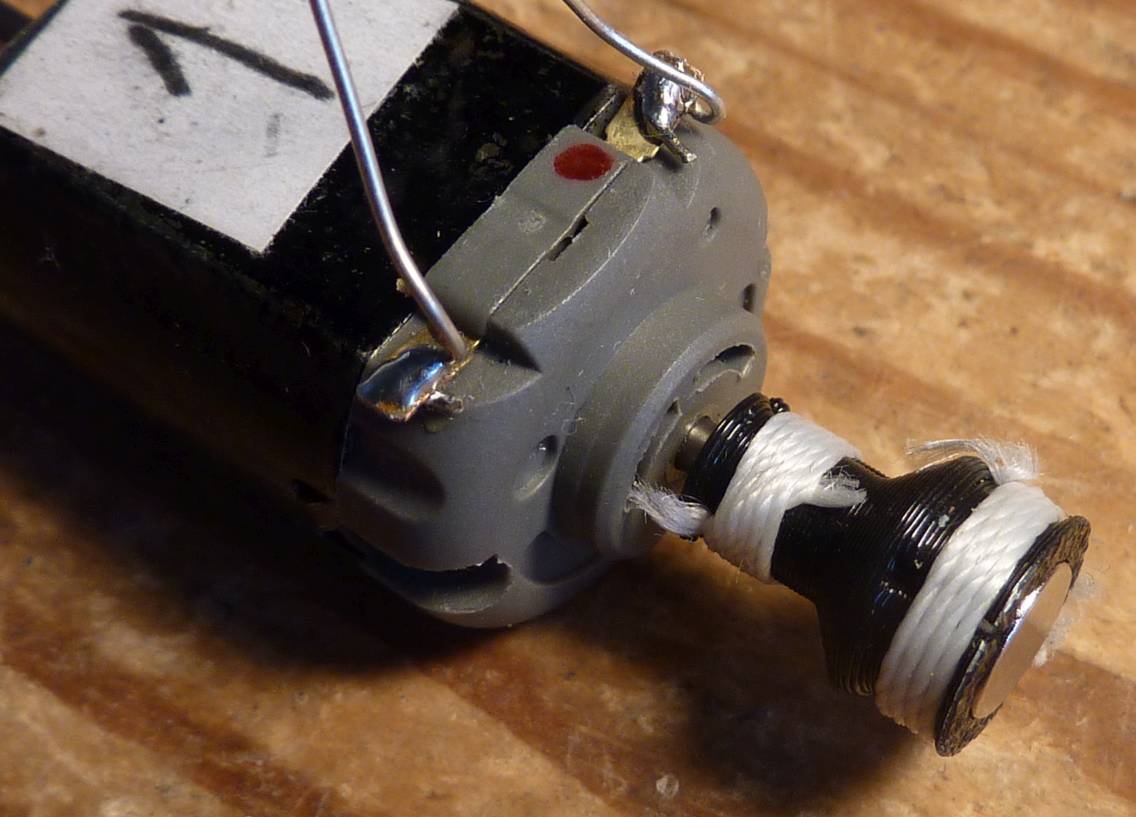
It will require more work to make it. You can achieve high pressure and friction to the shaft. Normal printing materials can have problematic relaxation figures, and then polyester or nylon thread will keep the pressure over time. You still needs to figure out the right print dimensions for the shaft diameter, but I guess it becomes less critical this way.
I used Tex135 polyester thread. I think Tex70 thread is too weak. For binding, you can use more Constrictor Knots or a modified multi-turn Strangle Knot with an extra Overhand Knot below the turns.