Code adaptation for storm32 BGC v1.31 - 3 x BLDC motors with SimpleFOClibrary

storm32_bgc v1.31

storm32_bgc

1. Hardware

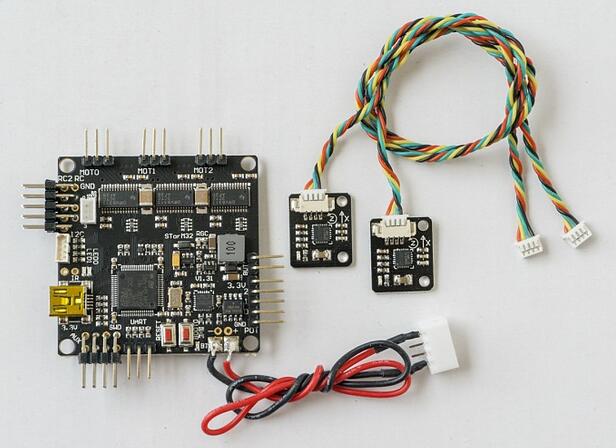
STorM32 V1.31 --www.olliw.eu
The red font is a hardware change


2. Bootloader

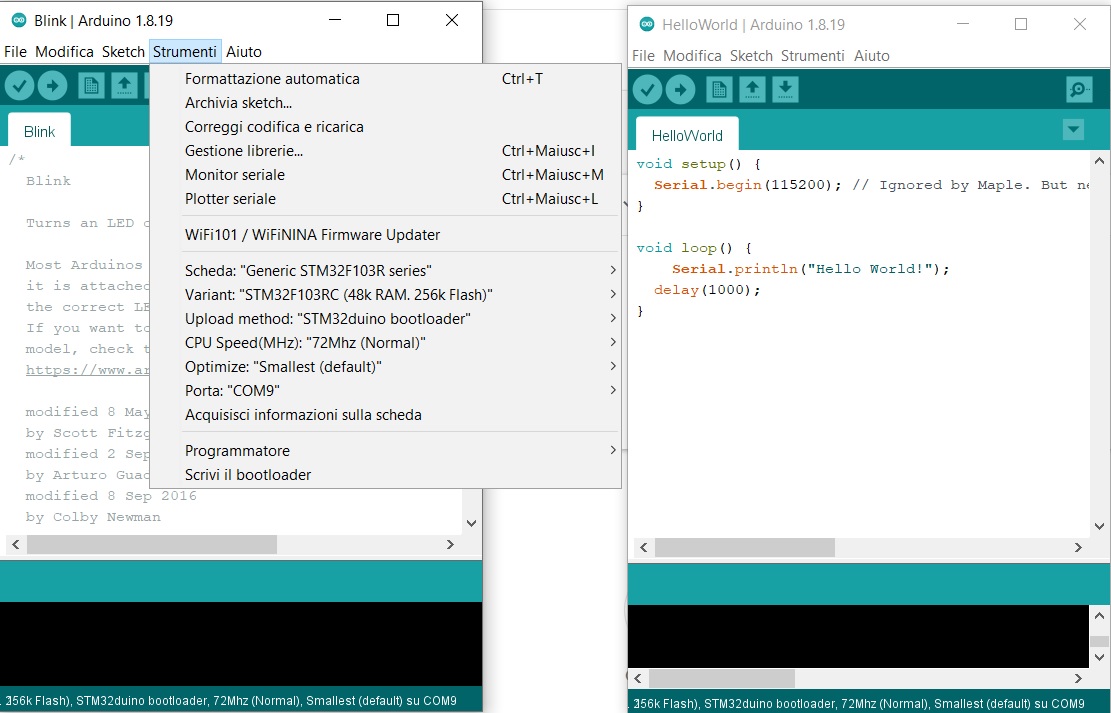
uses bootloader of “stm32duino” – “Generic STM32F103R Series”
-–>GitHub - rogerclarkmelbourne/Arduino_STM32: Arduino STM32. Hardware files to support STM32 boards, on Arduino IDE 1.8.x including LeafLabs Maple and other generic STM32F103 boards

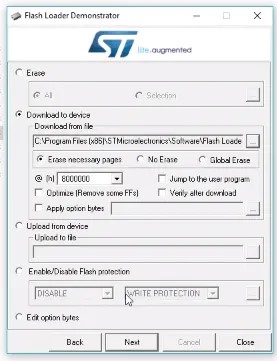
St official flasher tool

Used to refresh binary files - FLASHER-STM32 - STM32 Flash loader demonstrator (UM0462) (replaced by STM32CubeProgrammer) - STMicroelectronics

p03
p04

PA9---- STorM32 V1.3 JP7 -RC1
PA10 — STorM32 V1.3 JP7- RC0

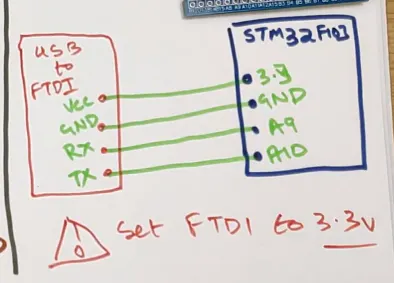
Note: refresh binary files —Connect boot0 to VCC (1) The boot0 is (STorM32 V1.3)’s SW2, When you use flash loader, you need to press SW2!

3. Changes of SPI in simplefoc

3.1: MagneticSensor.cpp Add the following lines

#include <SPI.h>
#define SPI1_NSS_PIN PA4    //SPI_1 Chip Select pin is PA4. You can change it to the STM32 pin you want.
#define SPI2_NSS_PIN PB12   //SPI_2 Chip Select pin is PB12. You can change it to the STM32 pin you want.
SPIClass SPI_2(2); //Create

3.2: MagneticSensor.cpp All of them: SPI.XXXX Statement, change to SPI_ 2.XXXXX
For example: SPI.begin () Change to SPI_ 2.begin();

4. About motor driver chip drv8313

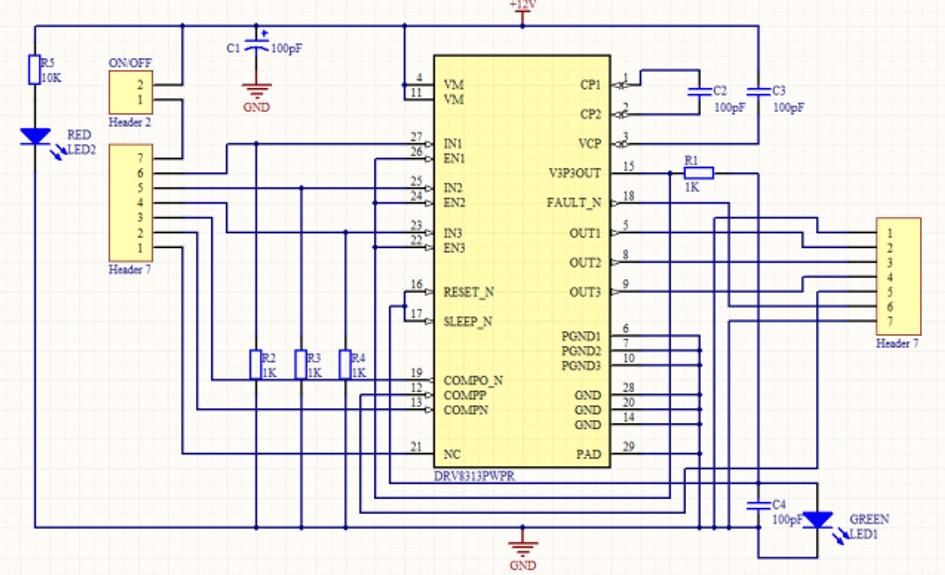
4.1: EN of drv8313_ The pin is directly connected to its own 3.3V, so when we use simplefoc, we set en_ When pin is used, only one idle pin needs to be found and no actual operation is needed
4.2: So, when you want to pass en_ When the pin turns off the motor, it is invalid. You can only let PWM be zero, which means the motor is turned off!

5. my test Code:

//STORM32 BGC Board V1.31 -->MCU == STM32F103RCT6 (48K RAM,256K Flash)
//                        -->MOTO Driver IC == Ti DRV8313
//Bootload: used STM32duino "Generic STM32F103R Series" 
//Hardware change:Undo LED0 & LED1, release PB12, PB13.
//Software migration: https://github.com/askuric/Arduino-FOC 

#include <SimpleFOC.h>

// External Encoder AS5048A/////////////////
#define ENC_SPI_MISO PB14  // AUX0 = D33
#define ENC_SPI_MOSI PB15  // AUX1 = D34
#define ENC_SPI_SCK  PB13  // LED1 pin =D32
#define ENC_NSS      PB12    // LED0 PB12 = D31 
// MagneticSensor(int cs, float _cpr, int _angle_register)
//  cs              - SPI chip select pin 
//  _cpr            - counts per revolution 
// _angle_register  - (optional) angle read register - default 0x3FFF
MagneticSensor AS5x4x = MagneticSensor(ENC_NSS, 16384, 0x3FFF);

//moto 12N14P size:4108 KV=66 (used storm32 BGC's MOTO0-PB1,PB0,PA7-->TIMER3-CH4,CH3,CH2)
const int MOTO_PhA_pin = PB1;  // A: PB1=D28
const int MOTO_PhB_pin = PB0;  // B: PB1=D27
const int MOTO_PhC_pin = PA7;  // C: PA7=D11
const int MOTO_EN_pin  = PA4;  // moto enable pin PA4=D10
const int num_pole_pair = 14;  // pole pair number

//  BLDCMotor( int phA, int phB, int phC, int pp, int en)
BLDCMotor motor = BLDCMotor(MOTO_PhA_pin , MOTO_PhB_pin , MOTO_PhC_pin ,num_pole_pair , MOTO_EN_pin);

//gets the target value from the user,when Test Moto velocity.
// velocity set point variable

float target_velocity = 0;
unsigned long  t = 0;
long timestamp = _micros();

void setup() {
 
   // debugging port:maple's DFU/Serial port
  Serial.begin(115200);
 // while (!Serial);
  _delay(100); 
  Serial.println("serial ready.");
  
  // initialise magnetic sensor hardware
  AS5x4x.init();

 // power supply voltage
 // default 12V
  motor.voltage_power_supply = 12;
  
  // choose FOC algorithm to be used:
  // FOCModulationType::SinePWM  (default)
  // FOCModulationType::SpaceVectorPWM
  motor.foc_modulation = FOCModulationType::SpaceVectorPWM;

  // set control loop type to be used
  // ControlType::voltage
  // ControlType::velocity
  // ControlType::angle
  motor.controller = ControlType::velocity;

  // contoller configuration based on the controll type 
  // velocity PI controller parameters
  // default P=0.5 I = 10
  motor.PI_velocity.P = 0.2;
  motor.PI_velocity.I = 20;
  // default voltage_power_supply/2
  motor.PI_velocity.voltage_limit = 6;
  // jerk control using voltage voltage ramp
  // default value is 300 volts per sec  ~ 0.3V per millisecond
  motor.PI_velocity.voltage_ramp = 1000;
  
  // velocity low pass filtering
  // default 5ms - try different values to see what is the best. 
  // the lower the less filtered
  motor.LPF_velocity.Tf = 0.01;

  // use debugging with serial for motor init
  // comment out if not needed
  motor.useDebugging(Serial);

  // link the motor to the sensor
  motor.linkSensor(&AS5x4x);

  // initialize motor
  motor.init();
  // align sensor and start FOC
  motor.initFOC();

  Serial.println("Motor ready.");
  Serial.println("Set the target velocity using Serial windows");
  _delay(1000);
}
unsigned long Now;
unsigned long delta=0,sum=0;
long loop_count = 0;

void loop() {
  // iterative state calculation calculating angle
  // and setting FOC phase voltage
  // the faster you run this function the better
  // in arduino loop it should have ~1kHz
  // the best would be to be in ~10kHz range
  static String inputString; 
  
  Now =  _micros();
  motor.loopFOC();
  delta =  _micros() -  Now;
  sum = sum + delta;
  if (loop_count++ > 1000) {
    Serial.print("LoopFOC Time (Dec)  :");
    Serial.println(sum/1000);
    loop_count=0;sum=0;
   }

  // iterative function setting the outter loop target
  // velocity, position or voltage
  // this function can be run at much lower frequency than loopFOC function
  // it can go as low as ~50Hz
  motor.move(target_velocity);
 
  // function intended to be used with serial plotter to monitor motor variables
  // significantly slowing the execution down!!!!
  // motor.monitor();
  
 
  if (Serial.available()) {
    // get the new byte:
    char inChar = (char)Serial.read();
    // add it to the inputString:
    inputString += inChar;
    // if the incoming character is a newline
    // end of input
		if (inChar == '\n') {
		target_velocity = inputString.toFloat();
		Serial.print("target_velocity: ");
		Serial.println(target_velocity);
		inputString = "";
		}
	}

  }

6. Hardware specific library modifications

6.1 PWM, DELAY…modify (The destination file is located in FOCutils.cpp )

void setPwmFrequency(int pin) {
    
    if (pin >= BOARD_NR_GPIO_PINS) {
		//Serial.begin(115200);
	  	//_delay(100);
        Serial.println("DEBUG: Set high frequency PWM.PIN Was wrong!!");
     }
	pinMode(pin, PWM);
	uint16_t ducty_Num_Max = 72000000/36000;
	
	timer_dev *dev = PIN_MAP[pin].timer_device;
	uint8_t cc_channel = PIN_MAP[pin].timer_channel;
	
	timer_pause(dev);
	ASSERT(dev && cc_channel);
	(dev->regs).bas->ARR = ducty_Num_Max;
	timer_resume(dev);
	timer_generate_update(dev);
}
  
   
// function buffering delay() 
// arduino function doesn't work well with interrupts
void _delay(unsigned long ms){
  long t = _micros();
  while((_micros() - t)/1000 < ms){};
}


// function buffering _micros() 
// arduino function doesn't work well with interrupts
unsigned long _micros(){
   
		return (micros());
}

6.2 setpwm() modify!(The destination file is located in BLDCMotor.cpp )

// Set voltage to the pwm pin
// - function a bit optimized to get better performance
void BLDCMotor::setPwm(int pinPwm, float U) {
  // max value
  float U_max = voltage_power_supply;
  uint16_t Max_ducty = 72000000/36000;  //72M主频除以PWM的频率,即为占空比最大细分度.
  // sets the voltage [0,12V(U_max)] to pwm [0,Max_ducty]
  // - U_max you can set in header file - default 12V
  int U_pwm = Max_ducty * U / U_max;

  // limit the values between 0 and Max_ducty
  U_pwm = (U_pwm < 0) ? 0 : (U_pwm >= Max_ducty) ? Max_ducty : U_pwm;
  U_pwm = U_pwm +0.5; //取整
  
  timer_dev *dev = PIN_MAP[pinPwm].timer_device;
  uint8_t cc_channel = PIN_MAP[pinPwm].timer_channel;
  ASSERT(dev && cc_channel);
  // CCR1的预加载寄存器使能,每次更新事件发生后才更新占空比
     __IO uint32 *ccr = &(dev->regs).gen->CCR1 + ( cc_channel - 1);
    *ccr = U_pwm;
    *bb_perip(&(dev->regs).bas->CR1, TIMER_CR1_CEN_BIT) = 1;
}
2 Likes

Hey @blackblue007, that is so cool!

I found Storm32 BGC 32Bit on Aliexpress with the price tag of 20$. This is probably one of the best price to quality/performance ratio you can find out there. :smiley:
Thanks for sharing!

From the version 1.3.0, Arudino SimpleFOClibrary will support stm devices so I invite you to test it with your device. It uses STM32Duino package for Arduino IDE and you will probably not need to modify hardware specific code you have changed as a point 6.

I’m looking forward to your “1.3.0”…

Im just loving the possibles of what we can do with the FOC Library:)

1 Like

its the as5040 your using here? I thought somehow that the SPI would limit to using only 2 Spi devices for the magnetic encoder. The drv8313 is a great little chip

1, I can drive two as504x with SPI1!
2. The important thing is that the SPI clock can’t be set too high. I only set it to 20000
During operation, for example, when I read the register data of “as504x-1a”, first pull the NSS signal line of “as504x-1a” to the low level (at the same time, the NSS signal line of “as504x-2a” must be in the high-level state), and then use the “SPI” function to read.
3. To be on the safe side, you can add some delay when you pull a NSS signal to a low level to prepare for read operation

Hey @blackblue007 - thanks for your work on storm32 - you’ve saved me hours! Can I ask you about your strategy to expose SPI2. I understand what you’ve done electronically - but I’m unsure what you’ve done physically. Like you - I also want to use two (or perhaps 3!) SPI sensors. Ideally I’d like two solid SPI ports where it’s easy to add remove sensors - but I’m probably asking too much!

So AUX0 is MISO, AUX1 is MOSI and LED1 (PB13) needs to be detached for the SCK. I guess I don’t have to touch LED0 (PB13) as I can use other pins for slave select.

Do you have a photo of what you did to remove the LED(s) and how your attach your SCK from sensor (e.g have you drilled a hole in the board or do you have a daughter board?).

1 Like

Just to add my 2c here:

my board came with the READ protection switched on for the STM32F103R. It took me literally forever to figure out the problem, since none of the toolings give you any kind of sensible error message related to this.
As long as this was on, there was no joy flashing the bootloader.

After switching the read protection off (in the Option Bytes (OB) tab of STM32CubeProgrammer) the board was directly and easily flashed.

:warning: Note that the code modifications mentioned by @blackblue007 above are only needed if you’re using “standard” Arduino toolings. I’m not sure I would recommend going that way. Instead, if you use PlatformIO the native STM32 support of SimpleFOC is working just fine, no code modifications required.

For flashing the bootloader, I use STM32CubeProgrammer, and an STLinkV2. Normally, I think having an STLink around is a good idea when working with STM32s.

The STLink connects via the SWD header, which first had to be soldered onto my version.

After flashing, you can program the Storm32 normally using Arduino IDE, Sloeber or PlatformIO, but none of them seem to like programming it via the USB port. At least my board seems to be missing something to make USB programming work. STM32CubeProgrammer also can’t connect via the USB port, but the port does work fine for Serial IO (not programming) and is the default “Serial” port for the code.

@Owen_Williams my next step is getting SPI working, so I’ll report on any progress I make on that…

I got it working ages back, haven’t used it for a liitle while. I seem to remember soldering a resistor and reusing a pin just to the left of the usb in pic

1 Like

Hi everybody, I’m trying to reprogram strom32 v1.32 with arduino ide, I have already flashed the botloader with the file “generic_boot20_pb12.bin” without problems, but now i’m trying with a simple sektch (Helloworld!) like shown in the photo but the serial monitor it’s empty (baudrate used 115200). i’m using an FTDI232 connected to PA9 and PA10. Can you check my configuration ide on the photo please? Thanks for you help. I remain at your disposal for any test.

Welcome, @castellucci5,

Have you tried enabling USB, and then checking the USB serial?

Looking over my code I have USB serial enabled, and no other special settings, so I’m guessing I was using USB serial… but its been a long time.

Hi @runger , Thanks for your advice. Now the blink example works. every time i load the firmware i have to press and hold the BOOT 0 button. I didn’t know that. Thanks again!

Nice description!

I’m working on reproducing it with a v1.32 bord version, which is technically the same board.

I don’t find the code you mention in Step 6), or any similar in the actual master.
It uses the hardware_specific/generic_mcu.cpp implementation which as I understand ignores the pwm_frequency parameter. The result is ~500Hz PWM freq, and loud motor which heats up.

Do you know the simple foc code version you were using?

Update: I tested with 1.3 and 1.4 which has a compatible code structure. The PWM freq. 5kHz now, but that’s still too low, and it seems the pwm setting part does nothing. I may need a specific Arduino_STM32 version to make it work?

Are you using platformio? If so you need to include lib_archive = false in your platformio.ini file

1 Like

No, I tried with arduino. But I just tested it with platformio, and with lib_archive = false it works. It’s 25kHz by default, and can be set up to 50kHz. (Without lib_archive = false it’s 1kHz constant.) Thank you for the help.

1 Like

Hi!
I’ve finally decided to ask for some help or thoughts, been reading the pages about setting up Storm32 BGC 1.32 to run 3 BLDC motors using SimpleFOC and as5048a encoders for feedback with SPI.

I can upload programs to the Storm32 BGC 1.32 using St-link and Platformio, I can make lights blink, and run a motor in openloop velocity using simpleFOC (using just one for testing purposes).
I can get the closed loop working with an arduino UNO and simpleFOC shield.

However I can’t get past motor initialization on the Storm32 with SPI for the as5048a.
I have soldered SCLK line to LED1 after removing the 2.2K resistor running to it, and I get a high pitched whirring from the motor as it searches back and forth and tries to align with the encoder, then gives up.

After going through the SimpleFOC library and BLDCMotor file, the initialization calls BLDCMotor:alignSensor() to find electrical zero angle.
I’m assuming the SCLK line is not functioning properly, so the motor can’t find the encoder Zero angle, so it quits and fails initialization?

I unplugged everything and removed the soldered SCLK line to LED1/PB13 to see what it looks like, have I screwed up that pin and that’s why I wasn’t getting a good SCLK signal?

Heres my wiring,
CS white = pot2/ PA15/aux2
SCLk red = LED1 PB13
MOSI black = PB15
MISO yellow = PB14
Grd Blue = Grnd
Green 3.3v = 3.3v

Heres my Platformio, its largely what @runger has provided in previous responses to attempts at this.

; PlatformIO Project Configuration File
;
;   Build options: build flags, source filter
;   Upload options: custom upload port, speed and extra flags
;   Library options: dependencies, extra library storages
;   Advanced options: extra scripting
;
; Please visit documentation for the other options and examples
; https://docs.platformio.org/page/projectconf.html

[env:genericSTM32F103RC]
platform = ststm32
board = genericSTM32F103RC
framework = arduino
monitor_speed = 115200
#lib_archive = false
build_flags =
  -D PIO_FRAMEWORK_ARDUINO_ENABLE_CDC
  -D USBCON
  -D USBD_VID=0x0483
  -D USBD_PID=0x5740
  -D USB_MANUFACTURER="runger"
  -D USB_PRODUCT="\"Storm32_SPM\""
  -D HAL_PCD_MODULE_ENABLED
lib_deps =
  # RECOMMENDED
  # Accept new functionality in a backwards compatible manner and patches
  https://github.com/simplefoc/Arduino-FOC.git
  #SPI

Heres the main as well

#include <Arduino.h>

#include "Wire.h"
#include "SPI.h"
#include "SimpleFOC.h"

#define V_PSU 10
#define V_LIMIT 10
#define V_INIT_LIMIT 10

// 3.3v is green on 
MagneticSensorSPIConfig_s AS5048 = {
  .spi_mode = SPI_MODE1,
  .clock_speed = 1000000,
  .bit_resolution = 14,
  .angle_register = 0x3FFF,
  .data_start_bit = 13,
  .command_rw_bit = 14,
  .command_parity_bit = 15
};


// Note: Storm32 SPI2 is PB13 == LED1 == CLK, PB14 == AUX0 == MISO, PB15 == AUX1 == MOSI
// Solder CLK line to PB13, which can be found on the 2k2 resistor R7 (see schematic) in the LED1 path

// top ring motor
#define SENSOR1_CS PC2  // POT2     //PA15  // AUX2 //White
MagneticSensorSPI sensor1 = MagneticSensorSPI(AS5048, SENSOR1_CS);
BLDCMotor motor1 = BLDCMotor(7);
BLDCDriver3PWM driver1 =  BLDCDriver3PWM(PB1, PB0, PA7);

float target1; 


void initMotors() {

	pinMode(SENSOR1_CS, OUTPUT);
	digitalWrite(SENSOR1_CS, 1);
	sensor1.init();
	motor1.linkSensor(&sensor1);


	driver1.voltage_limit = V_LIMIT;
	driver1.voltage_power_supply = V_PSU;
	driver1.init();
	motor1.linkDriver(&driver1);


	motor1.voltage_limit = V_LIMIT;

	motor1.voltage_sensor_align = V_INIT_LIMIT;

	motor1.controller = MotionControlType::angle;

	motor1.PID_velocity.P = .1; 
  
	motor1.PID_velocity.I = 20;
  
	motor1.PID_velocity.D = 0;

	motor1.PID_velocity.output_ramp = 1000;

	motor1.LPF_velocity.Tf = .01;

	motor1.P_angle.P = 1;


	motor1.init();
	motor1.initFOC();
	
	// TODO store motor initialization params and only re-init if we can't load them (and provide a command to reset them)

	motor1.sensor_offset = motor1.shaftAngle();

	target1 = 20;


}

void setup() {
	pinMode(PB12, OUTPUT);
	digitalWrite(PB12, 1); // switch on lED for initialization
	delay(2000);
	digitalWrite(PB12,0);
	delay(500);

	motor1.velocity_limit = 10;
	
	SPI.setMOSI(PB15);  //Black
	SPI.setMISO(PB14);  //yellow
	SPI.setSCLK(PB13);  // Red

	initMotors();
	//Serial.println("SPM motor initialization complete.");
	//digitalWrite(PB12,0);
}
void loop() {
//Serial.println("Loop running...");
//delay(1000); // Just to slow down the prints

}

Thanks for any ideas!

Hi Richard :slight_smile:

So first a few general points:

  1. it is possible to get this board working with SPI, I’ve done it myself
  2. However, its MCU is not really powerful enough to run 3 motors with SimpleFOC, and so the performance you will get won’t be great.

Regarding the SPI soldering:

  • I think I even left the LED and resistor on there. As long as you solder to the side of the resistor that is connected to the MCU it should work ok.
  • check for connectivity using your multimeter - the end of the SPI SCLK cable and the MCU pin PB13 should be nicely connected, with almost no resistance.
  • once you are happy the connection is good, secure it. I used “Sugru” which is like a non-conductive mouldable glue compound. A dab of this dries in a few hours, but can still be removed without too much hassle. It will prevent you damaging the solder connection by accidentally pulling on the wire.
  • after securing, recheck the connection with the multimeter

Testing the sensor:

  • run our sensor test program, or write a small one yourself to test the SPI sensor. Leave out all the motor code and other stuff.

  • you can use the dedicated AS5048A driver from our drivers library. It will allow you to read/write the other sensor registers, in particular you can use it to check the magnitude of the magnetic field and read the sensor status for errors.

  • you can adjust the SPI clock speed to find a speed that gives reliable readings.

  • if you can’t get the sensor to work like this, then there are issues - either with the connection, the sensor or the power supply to the sensor (3.3V and 5V require different configurations of the sensor power circuit - is your sensor suitable for the voltage you’re using?)

  • the nCS line normally needs a pull-up, so you could re-initialize it with internal pull-up:
    sensor.init(); pinMode(PA15, INPUT_PULLUP); or modify the library code to do so. At the moment the library code (both MagneticSensorSPI and the MagneticSensorAS5048A) initialize this pin in OUTPUT mode (no pull-up). Or you can add an external pull-up resistor. Not sure this will solve your problem though

  • you can use a logic analyser to look at the SPI signals between sensor and MCU to see the problems.

In parallel to this you can also test the motors in open-loop mode. Be careful to set appropriate voltage limits, and if possible use a power supply with current limiting for first tests.
Testing this will ensure the drivers and PWM generation is working as expected, and the motors can work in principle.

Then, when both motors and sensor are working independently, put them together to get closed loop control :slight_smile:

Regards,
Richard

Hi runger!
Thank you so much for the help! I’ll try out those suggestions, and if I can get it working I’ll post the final result.

Also I’ve seen you mention the STEVAL GMBL02v1, I have one and correct me if I’m wrong but the F303RE is not compatible with the arduino framework correct? So it would have to be programmed using HAL FOC control libraries?

No, you can use this board from Arduino framework, although it might take quite a few settings in terms of adjusting the pins etc… you could use a genericF303 board definition or maybe the Nucleo F303RE.

The STEVAL board is much easier to use as you can find pins suitable for SPI on its various IO headers. But of course its STSPIN233 drivers are only suitable for quite small motors, with <2A current capability.

Update:
Haven’t given up, finally figured out one of the problems. The board I did modify with the LED pin soldered for SPI was actually a bad board as best I can tell. Couldn’t get any bootloader to work with USB Serial terminal, but was programmable. So I resorted to cycling different pins HIGH/LOW and went looking for them with a multimeter. I could find them on the chip, but was hit or miss on finding where they went, and wasn’t getting LED1 or 0 high at any point.
I do have another Storm32 I haven’t modified that’s working with USB Serial output. Just waiting on more boards to arrive and make sure they work before modifying this one.

The Steval-GMBL I messed with for a bit, but could only get desired results of blinking the LED using HAL, so I tried remapping the pins in the St Nucleo F303RE files without success. Not sure I want to head down the rabbit hole of writing everything for FOC using HAL just yet.